Thursday, May 25, 2023

Update - Teams Room Pro Portal for Manual MTR Teams App update & ServiceNow Incident Process for Warning & Recommendation alerts


In the last article, we looked at eligible Microsoft Teams Room on Windows devices getting Windows 11 22H2 update. The update is coming starting June'2023. Microsoft released the new MTR Teams App version 4.16.134 for Windows, which you can install using a manual method to validate whether your devices are eligible and working as expected. If any Windows Update URL/IPs are blocked on your network/Proxy.


Microsoft Teams Pro portal now has the new option under the action tab on the device page to trigger the Teams app upgrade without you logging in to the device to install/upgrade them.

  • Login to https://portal.rooms.microsoft.com with the administrator role.
  • Select Room on the left side and select the desire MTRoW device.
  • Select Action tab and select "Install Teams Meeting Room 4.16.134 update and click "Run"
  • Provide the justification and Click "Run".


It's important to be aware that while upgrading, you won't be able to multitask until it's finished.


You can check the status under the activity tab


The upgrade will be completed in just 5 minutes, and after that, you will have access to more detailed information about it.


Once the Teams app upgrade to latest version ensure the Teams is able to login successfully at least once. Once the release has been installed and the devices have been successfully booted up, switch to admin mode and use the Windows Settings app to check for updates. Depending on the supported devices, you should be offered the option to download and install either Windows 11 22H2 or Windows 10 22H2.


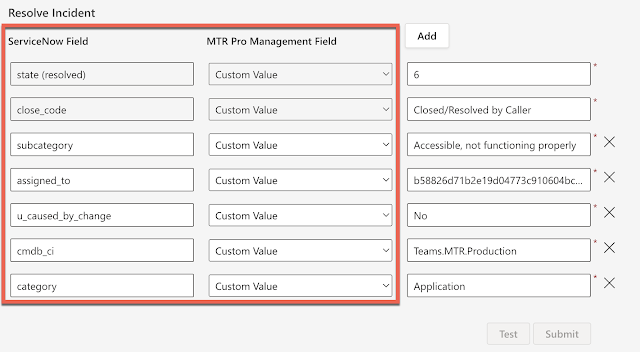
For those customers using the ServiceNow ticket integration, all Warning & Recommendations incidents (including Security) will no longer generate a SNOW ticket from the Pro Management portal. This change only affects ServiceNow integration. Any warning or Recommendation incident will still be visible on the Incident dashboard; under the individual Room status and through email notifications.


Windows 11 support for Teams Rooms on Windows devices

Beginning in June of 2023, Teams Rooms on Windows devices that meet eligibility requirements will be upgraded to Windows 11 22H2. This upgrade will enhance the functionality and overall performance of your device, providing an even better user experience. This will be offered and installed on their devices with 4.17 dot release. Devices that are not eligible due to an incompatible processor will continue to use Windows 10 22H2 release.

If your device cannot upgrade to Windows 11, don't worry. It will still be supported until either the end of Windows 10's General Availability Channel servicing or the end of hardware support from the manufacturer, whichever comes first. 

Windows 10 IoT Enterprise will soon reach the end of its license sales (10/14/2023), causing Teams Rooms on Windows OEMs to switch to Windows 11 IoT Enterprise for manufacturing. However, OEMs who have existing Windows 10 licenses inventory may still use them to provide Windows 10 based images for a while. These images should automatically update to Windows 11 after setup. Nonetheless, all OEMs are expected to eventually transition to Windows 11 IoT Enterprise based images. To ensure the longevity of their device investment, customers should verify that any new hardware purchases are compatible with Windows 11.

The release of Microsoft Teams Rooms on Windows application version 4.17 has been postponed from May to June 2023. This app will enable Teams Rooms on Windows devices that meet the eligibility requirements to receive the Windows 11 22H2 update via Windows update. Once the dot release has booted normally at least once, customers can either wait for 8 days for the Windows 11 22H2 update to install automatically or manually check for updates from the Windows Settings app to pull the latest Windows 11 update. For devices that are not eligible, the Windows 10 22H2 release will be offered.

To check if your device is eligible for Windows 11, you can either check the list of eligible Intel processors for Windows 11 at https://learn.microsoft.com/en-us/windows-hardware/design/minimum/supported/windows-11-supported-intel-processors

To avoid any obstacles that may hinder the Windows update process in your system, we advise updating a few devices manually with 4.16.134.0. Once the release has been installed and the devices have been successfully booted up, switch to admin mode and use the Windows Settings app to check for updates. Depending on the supported devices, you should be offered the option to download and install either Windows 11 22H2 or Windows 10 22H2.

Wednesday, May 17, 2023

Enhancement - Customize your Teams Rooms on Windows experience with the new custom background feature and default home screen!

The refreshed home screen of Microsoft Teams Room on Windows received modern UI/UX updates in March 2023. This update was initially released as an 'opt-in' feature in version 4.16 of the app.

Please take a look at the below blog for information.

https://m365community.blogspot.com/2023/03/teams-app-update-416-on-microsoft-teams.html


Starting June'2023 the Teams Room App 4.17 release the modernized home screen will become the default experience.

License requirement - Teams Rooms Pro license is needed to consume the Enhanced custom background feature.


If your business is using Teams Rooms with the latest home screen experience and Teams Rooms Pro license, you'll be happy to know that IT administrators can now choose three background images and specify which one is displayed on the main room, extended room, and room console. This can be done by adjusting the XML settings, giving you greater control over conference rooms.

<Theming>

<ThemeName>Custom</ThemeName>

<CustomBackgroundMainFoRDisplay>file1.jpg</CustomBackgroundMainFoRDisplay>

<CustomBackgroundExtendedFoRDisplay>file2.jpg</CustomBackgroundExtendedFoRDisplay>

<CustomBackgroundConsole>file3.jpg</CustomBackgroundConsole>

</Theming>


<CustomBackgroundMainFoRDisplay> – this XML setting specifies the background for the right side of the dual display, which has the calendar; input in this setting is required regardless of whether the device is in single or dual display mode.


<CustomBackgroundExtendedFoRDisplay> – this XML setting specifies the background for the left side of the dual display, which has the time and room info; input in this setting is required when the dual display setting is ON


<CustomBackgroundConsole> – this XML setting specifies the background for the room console; input in this setting.


Use the following image dimensions (based on 1080p display standards) for each screen aspect ratio respectively: 

16:9 – 1920 x 1080 px (minimum image dimension required for room displays)
21:9 – 2560 x 1080 px
3:2 – 1920 x 1280 px
16:10 – 1280 x 800 px (minimum image dimension required for room consoles)

The full image will be shown if a 4K image with a 3840 x 2160 px dimension is applied to a 4K display. However, if the dimensions of the image and the display do not match, the image scales to fill the frame while preserving the image aspect ratio (without letterboxing) and/or the image is cropped from the center. 

For example: If a 1080p image (1920 x 1080 px) with a 16:9 aspect ratio is applied on a 21:9 display, the image scales to fill the frame without distorting the image and is cropped from the center.

If a 4K image (3840 x 2160 px) is applied on a 1080p display, the image is cropped from the center.

The new custom background XML settings will replace the legacy custom theme settings.

How to block Teams Meeting chat Read and Write access to anonymous attendees

If your organization has concerns about anonymous users starting or joining Teams meetings, there's a way to address it. By disabling the option in the Teams Meeting policy and assigning it to the user, you can prevent anyone from joining as an anonymous user. It's a straightforward solution that can help ensure the security and privacy of your meetings.


In case your organization permits anonymous users to join the call without starting the meeting, and only the organizer wishes to let them in, configuring the meeting policy can be a viable option.

If you are hosting a Teams meeting with external or anonymous participants, you should prevent them from accessing the meeting chat. This can help you avoid unwanted messages or spam from unknown users. 


By default, anonymous users joining a meeting can view & send chat messages. However, you can disable their read access by following these steps:


1. Go to the Teams admin center (https://admin.teams.microsoft.com/) and sign in with your admin credentials.

2. In the left navigation, go to Meetings > Meeting policies.

3. Select the policy that you want to edit or create a new one.

4. Scroll to the Meeting engagement section and set Chat in meetings to On for everyone but anonymous users. This will block anonymous users from both writing and reading the chat messages.

5. Select Save to apply the changes.


Please note that this particular setting is only applicable to meetings that are not hosted in a channel. In the case of channel meetings, you have the ability to manage and determine who is authorized to post messages within the channel settings.


To configure this setting, PowerShell can come in handy. Simply use the -ChatInMeetings parameter in Set-CsTeamsMeetingPolicy. If you want to set this parameter to On for all users except anonymous ones in the global policy, you can execute this command:


Set-CsTeamsMeetingPolicy -Identity Global -ChatInMeetings EveryoneInCompany


Saturday, May 13, 2023

What are the best practices to configure Microsoft Teams Pro portal ServiceNow integration for larger organizations with multiple service desk teams?

A reader of mine recently asked how they should go about configuring the Service Management Ticking queue for a multinational organization that has multiple service desk teams handling devices at the regional level.


In the last post, we looked at how to configure Microsoft Teams Room Pro portal integration with ServiceNow for an automatic ticketing solution. Please read it if you missed it


1. Create a Group -

    • Navigate to " Settings" and select "Groups"
    • Click "Create new group"
    • Give Name and Description and click Next


When you're in the Assign room section, you have the option to use different filters to sort through the information about the rooms.


If your organization follows the practice of creating resource accounts based on region prefix, then you can easily filter the available rooms by using the same prefix.


After filtering the room, you can proceed by clicking the "Add new group" button.


You can now view all the groups you created by filtering various region/OS Type options in the Group section.


2. Assign devices to regional-specific Service- Now Incident Queue -

  • In the ServiceNow integration section under "assignment group" click "Add Room Group"
  • Select the Device Group created above.

  • Type the Service-Now incident queue name.
  • Click "Test" Once the validation is successful click "Submit"


Major update to Microsoft Teams App Store


Many organizations face challenges when implementing new applications as they need to conduct various processes such as security assessments and penetration testing before assigning access policies to the app. They have chosen not to display blocked apps in Teams App Store due to various reasons, such as meeting company security requirements.


If you opted out of this feature, which is configured by the Microsoft backend team for your tenant, then it would be helpful for you to take a look at this.


Now Microsoft gives the flexibility to tenant admins to configure how you want to handle the blocked apps in the Microsoft Teams client app store.

From July 10th, 2023, Microsoft. will no longer offer manual opt-out configuration in the backend. If you persist in blocking the already blocked in the Teams client, you will have options for configuration through Graph API or Graph PowerShell.


Microsoft Graph PowerShell -

  •     Toggle the visibility of the blocked apps (MC411463 August '22).


Import-Module Microsoft.Graph.Teams
$params = @{
"@odata.type" = "#microsoft.graph.teamsAppSettings"
AllowUserRequestsForAppAccess = "false"
}

Update-MgTeamworkTeamAppSetting -BodyParameter $params

  •     Allow Teams users to request admins for access to certain Teams Apps
Import-Module Microsoft.Graph.Teams
$params = @{
"@odata.type" = "#microsoft.graph.teamsAppSettings"
AllowUserRequestsForAppAccess = "true"
}

Update-MgTeamworkTeamAppSetting -BodyParameter $params

Please ensure that the scripts are executed within the allotted timeframe. Failure to do so will result in the opted-out status being reverted and the blocked apps becoming visible to end users.

Process Enhancement for blocked apps in Microsoft App Store

In the early part of May last year, Microsoft implemented an update that enabled the display of all the apps that were either blocked or allowed within the Microsoft Teams client. 

Users in Teams client can now browse the Teams App Store and discover apps that have been banned within their organization. They can then request approval from their administrators by simply clicking the 'Request approval' button.


As a Teams Administrator, you have the ability to customize the user request form for app requests in the Teams client. This allows you to include specific instructions for your users. Additionally, you can also include a Service Management URL or HelpDesk Support external link, which will redirect your users to the appropriate support resources.

  • To configure user request settings for Teams, you'll need to log in to https://admin.teams.microsoft.com with Teams Administrator access. 
  • Once you're in, navigate to Teams Apps and select Manage Apps
  • From there, go to the top right and select "Org-wide app settings". 
  • Scroll down to the "User request configuration" section and update any custom page for users. 
  • Next, select "Redirect requests to external link" and update the HTTPS URL. 
  • Finally, click Save the Configuration to complete the process.


After the aforementioned modifications have been made, the user's request will be directed to an external URL.


By utilizing this URL, numerous organizations can easily adhere to their existing service management process, thereby simplifying user requests.

Friday, May 12, 2023

Integrate Microsoft Teams Room Pro Management portal with ServiceNow for automatic ticketing based on the device health status

Microsoft Teams Room Pro Management Portal is a powerful tool that allows you to monitor and manage your meeting rooms across your organization. It provides you with a comprehensive view of the health and status of your devices, as well as alerts and incidents that require your attention.


The portal provides various signals that indicate the status of your devices, such as:


- Sign-in Exchange: Shows whether the device is signed in to Microsoft Exchange Online to fetch calendar information.

- Sign-in Teams: This shshowshetherhe device is signed in to Microsoft Teams to join meetings.

- Monitored or Offline: Shows whether the device is online and sending telemetry data to the portal or offline and not reachable.

- Camera, Microphone, Speaker: Shows whether the device has any issues with its peripherals that may affect meeting quality.


You can also view incidents that affect your devices, such as misconfiguration, sign-in failure, or device malfunction. 


But what if you want to integrate this portal with your existing IT service management system, such as ServiceNow? How can you automate the creation and resolution of tickets based on the incidents detected by the agents on the device?

What are the prerequisites for ServiceNow integration? -

  • Service Administrator access in the Pro portal.
  • Create a service account in ServiceNow and assign an Incident Manager role.
  • ServiceNow should support table API.
  • ServiceNow Instance and URI.

Integrate ServiceNow -

  • Login to https://portal.rooms.microsoft.com with the service administrator role.
  • Select ServiceNow under settings.
  • Enter service-id and password created in ServiceNow.
  • Enter the ServiceNow Instance Name. In the API URI, append "/api/now/table/incident"


Field Mapping -

All required items in the ServiceNow Field column of the Field Mapping section should be pre-filled. The table below contains each ServiceNow field and its corresponding Microsoft Teams Rooms field. Complete the action for each row of the Field Mapping section. 


Please make sure to select Test at the bottom of the configuration form once you're done. 

This step is important as it is required to submit your configuration. Upon passing the test successfully, don't forget to select Submit to save your changes. 

When you're ready to enable ServiceNow for your organization, simply toggle the Do you want to enable ServiceNow? switch to On.


Test the integration -

Once you enabled the ServiceNow integration the tickets will automatically be created based on the alert generated in the Pro portal.


Friday, May 5, 2023

New Enhancement for Update Management in Teams Room Pro Portal

If you are using Microsoft Teams Rooms devices and their peripherals in your organization, you should know how to manage their updates effectively and efficiently. In this blog post, I will explain how you can use the Microsoft Teams Rooms Pro Management portal to view, control, and apply updates to your rooms.


The Microsoft Teams Rooms Pro Management portal is a cloud-based management solution that proactively monitors and updates Microsoft Teams Rooms devices and their peripherals. It provides a high-level overview of the health and status of your rooms and the ability to intervene in exceptional situations. You can access the portal by logging in with your Managed Service Administrator role credentials.


To view updates, navigate to the Updates page in the portal. The Updates pane displays the following tabs:


- Updates: Software or firmware updates that are applicable to your organization. You can see the update name, description, severity, release date, and status for each update.

- Devices: The list of devices that are eligible for updates. You can see the device name, room name, location, device type, current version, available version, and update status for each device.

- Rings: The groups of devices you can create to control how updates are rolled out. You can see the ring name, description, number of devices, number of updates, and update status for each ring.


You can choose how updates are managed for your devices by using one of the following options:


- Automatically managed: Updates are automatically applied to your devices as soon as they are available. This option ensures that your devices are always up-to-date and secure.

- Ring validated: Updates are applied to your devices based on the rings you create and configure. This option allows you to test updates on a subset of devices before rolling them out to all devices.


To create a ring, click the Create Ring button on the Rings tab. You can give your ring a name and a description and select the devices you want to include. You can also specify your ring's update schedule and window.


To apply an update to a device or a ring, select the device or the ring on the Devices or Rings tab, then click the Apply update button. You can see the progress and status of the update on the same tab.


With the Microsoft Teams Rooms Pro Management portal, you have a powerful ally to ensure your meeting rooms are always up-to-date and prepared for any event. This tool helps you stay on top of the latest features, security patches, and bug fixes, so your rooms are always at their best.


There has been a recent improvement in the way updates are managed.


With the new update, you can now able to "Pause", or "Force Updates" at the Ring level or Individual device.


Pause - Pause a specific Windows Update across all devices and rings.

Unpause -Resume a previously paused Windows Update across all devices and rings.

Force -Force a specific Windows Update per device (irrespective of deployment rings).


You have the ability to choose multiple updates for a specific device and push the update regardless of its ring level. Upon clicking the force updates button, you will be presented with the option to either push the update right away or wait until it becomes available.


Wednesday, May 3, 2023

Microsoft Teams Room Pro Management Portal device registration process update

Heads up! If you're monitoring MTRoW, MTRoA, and Surface Hub 2S devices using the Teams Room Pro management portal, you need to pay attention to this important change. Starting May 15, 2023, all new device enrollments into the Teams Rooms Pro Management portal will require a Teams Rooms Pro or existing Teams Rooms Premium license. This means that devices without a qualifying license won't be able to access Teams Rooms Pro device management capabilities like health signals, incident generation, and insightful reports. To ensure that you're getting the most out of your Teams Rooms Pro experience, it's crucial to make sure that your devices are properly licensed.


Centralized dashboard: You can view the status, health, and performance of all your MTR devices in one place, with detailed metrics and alerts.

Remote configuration: You can apply settings and policies to your MTR devices remotely without physically accessing them or using PowerShell scripts.

Firmware updates: You can schedule and deploy firmware updates to your MTR devices automatically, ensuring they are always up-to-date and secure.

Device insights: You can access historical data and trends on your MTR devices, such as usage, call quality, network connectivity, and more.

Device diagnostics: You can run diagnostic tests and collect logs from your MTR devices, which can help you troubleshoot and resolve issues faster.


Feel free to check more details about the Room License and how to migrate the existing licenses.

Microsoft Teams Rooms licenses - Microsoft Teams | Microsoft Learn


Monday, May 1, 2023

What's the difference between MS Booking vs Teams Virtual Appointment?


If you are looking for a way to schedule and manage virtual appointments with your customers, you might be wondering what is the difference between MS Booking and Teams Virtual Appointment. Both are Microsoft 365 apps that integrate with Teams and Outlook, but they have different features and use cases.


MS Booking is a web-based (https://outlook.office.com/bookings) app that lets you create and publish a booking calendar for your services, staff, and availability. You can customize your booking page with your logo, business information, and service details. Your customers can access your booking page online and book an appointment with you or your staff. You can also use the Bookings app in Teams to view and manage your bookings, send confirmation and reminder emails, and conduct virtual appointments via Teams.


Teams Virtual Appointment is a premium app that provides a complete platform for business-to-customer engagements. It includes all the features of MS Booking, plus advanced capabilities such as a queue view of scheduled and on-demand appointments, SMS text notifications, custom waiting rooms, and analytics. You can use the Virtual Appointments app in Teams to schedule, view, and manage virtual appointments, get real-time status updates, view reports to gain insight into virtual appointments activity, and configure calendar, staff, and booking page settings.


Modify the meeting option based on your needs

  • Navigate to Analytics & reports section
  • Select Usage Report, in the drop-down menu select "Virtual Appointments usage / Advanced virtual appointments."
  • Select Run report.


The main difference between MS Booking and Teams Virtual Appointment is that MS Booking is a simple and easy way to schedule and manage virtual appointments, while Teams Virtual Appointment is a comprehensive and powerful solution for business-to-customer interactions. Depending on your needs and preferences, you can choose the app that suits you best.

An account with the same name exist in Active Directory. Re-using the account was blocked by security policy.

I recently encountered when Microsoft Teams Room on Windows system went for re-imaging due to local hardware failure the system couldn't rejoined to domain even if you reset or re-create the computer objects.


The issue caused because of KB5020276 were Microsoft has strengthened their security measures for re-using a domain's computer object. The client computer queries Active Directory for an existing account with the same name. This query occurs during domain join and computer account provisioning. If such an account exists, the client will automatically attempt to reuse it. The reuse attempt will fail if the user who attempts the domain join operation does not have the appropriate write permissions.


Solution -


Microsoft released an update for the above KB in March-2023, with a couple of updates to fix this hardening issue. They expanded the scope of groups Domain Administrators, Enterprise Administrators, and Built-in Administrators are exempt from this hardening. 

You can also configured trusted computer account owners to bypass the security check.

  • The account is owned by a user specified as a trusted owner in the “Domain controller: Allow computer account re-use during domain join” Group Policy.

  • The account is owned by a user who is a member of a group specified as a trusted owner in the “Domain controller: Allow computer account re-use during domain join” Group Policy.

  • Configure the policy under Computer Configuration\Policies\Windows Settings\Security Settings\Local Policies\Security Options, double-click Domain controller: Allow computer account re-use during domain join.

To ensure optimal performance, it's recommended that your Windows PC and domain controllers are updated with either the March-2023 update or the latest available update.


An alternate workaround (see below) is available, but please note that this option will no longer be available after the September 9,2023 updates. To address this issue, it is highly recommended to either create a GPO policy that allows custom AD accounts to be trusted or to have DA access.


Reg add HKLM\System\CurrentControlSet\Control\Lsa /v NetJoinLegacyAccountReuse /t REG_DWORD /d 1 /f


Once the system is joined to the domain using the NetJoinLegacyAccountReuse method, reverting the change is highly recommended.


Reg delete HKLM\System\CurrentControlSet\Control\Lsa /v NetJoinLegacyAccountReuse /f