Tuesday, September 27, 2022

How to mask/unmask external/internal PSTN user phone number that is joining Teams meeting

Microsoft recently added privacy configuration for the PSTN caller dialing in to the Teams Meeting through audio conferencing. By default, external phone is masked for internal participants. 

It's a global configuration.


Tenant Admin Configuration (GUI)-


  • Login to Microsoft Teams Admin Center, select "Meetings",
  • Navigate to "Conference Bridges" in the left side,
  • Select "Bridge Settings" and choose "Display masked caller-ids", it will allow you to choose the following:
    • To participants outside your organization
    • To all meeting participants
    • Disabled


  • To participants outside your organization - Phone numbers are masked only from external participants. The participants who belong to the meeting organizer's tenant still see the full phone number.
  • To all meeting participants - Phone numbers are masked from everyone in the meeting except the organizer.
  • Disabled - Phone numbers are unmasked, which makes them visible to everyone in the meeting.
Tenant Admin Configuration through PowerShell -

To mask the external phone number/participant in the meeting

Set-CsOnlineDialInConferencingTenantSettings -MaskPstnNumbersType "MaskedForExternalUsers" 

To mask the phone number for all participants except organizer

Set-CsOnlineDialInConferencingTenantSettings -MaskPstnNumbersType "MaskedForAllUsers"

To Disable the phone number mask to make it visible to everyone.

Set-CsOnlineDialInConferencingTenantSettings -MaskPstnNumbersType "NoMasking"

Monday, September 26, 2022

Microsoft Teams Room on Android (MTRoA) deployment (Step-by-Step) Instruction - Part -3

 In Part - 1 and Part - 2 we looked at Licensing requirements, Resource Accounts, Group Based Licensing setup, Calendaring configuration for Room accounts, and Proxy/network setup.

In this article, we are doing the actual device configuration. for my setup, I'm using Neat, but most of the configuration is similar for other MTRoA devices as well.

Deployment Steps -

In the Part - 2, we connected the (Neat Bar & Pad )device and booted the OOBE setup. Select your language and Click "Continue"


Choose the device setup e.g Neat Bar + Pad for MTRoA deployment
Pls refer to this document for the mounting guide options for your deployment.


Select "Network Settings" to define the Proxy and NTP server information.
Note: -
The device either only can be connected to Wi-Fi or LAN connection.


Update the proxy if you have it in your environment. If you have direct internet access you can skip this step.


Once you have access to the network, click "Continue"


Select your time zone and click "Continue"


Pad and Bar/Bar Pro can discover each other (and maintain pairing) using themulticast DNS, mDNS, protocol. These multicast packets need to always travel between the two devices. 

You will need to make sure the Pad and Bar/Bar Pro are on the same subnet and mDNS is enabled on your network.

Find the Neat S/N on the TV Screen and select the right one if more than one shows on the Neat Pad and click "Continue"

Pad discovers Neat Bar S/N.


Similarly, you will find the Bar S/N on the Front Room Display as well. Double confirm and tab on the S/N on the Console and click Continue.


Once the pairing is successful, Select "Continue".


If you see any updates available, click "update".


The system will automatically download & install the latest firmware/Teams client version/Intune Company Portal app updates.


Once the update is completed. Choose "Microsoft Teams" for Neat Bar + Pad.


The system will install the Teams application for registration.


Once the Teams application is installed, Select "Launch Microsoft Teams".


Pairing –

Neat has partnered with Microsoft to run Microsoft Teams Rooms for Android (MTRoA) software on top of Neat firmware. It is possible to update both 'Neat' firmware or 'Microsoft Teams software' separately on a Neat device.

There are two parts to the software package:

The Neat firmware, by the Neat team, controls all Neat specific features, settings, and hardware elements of the device. Each Neat device runs its own type of Neat firmware (e.g. prefixed as 'NFB1' (Bar), 'NFA1' (Pad), and 'NFC1' (Board)).

The Microsoft Teams Room software, by Microsoft, controls all Teams specific features. The Neat Pad runs either the Center of Room (CoR) console or Teams panel software and the remainder of Neat devices run the Microsoft Teams Room for Android (MTRoA) software.

The two levels of pairing therefore are:

Neat level pairing: 

This occurs between two Neat devices' during the initial out-of-box setup. This is currently done between a Neat Bar/Bar Pro and a Neat Pad.

Microsoft Teams Rooms pairing: 

This occurs between two Neat devices after launching the Teams software. The Neat Bar, Bar Pro, and Board will run as Microsoft Teams Room for Android (MTRoA) devices and the Neat Pad will run as the Center of Room (CoR) console or Teams panel.


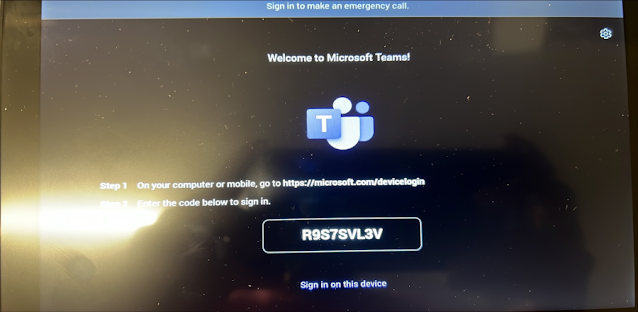
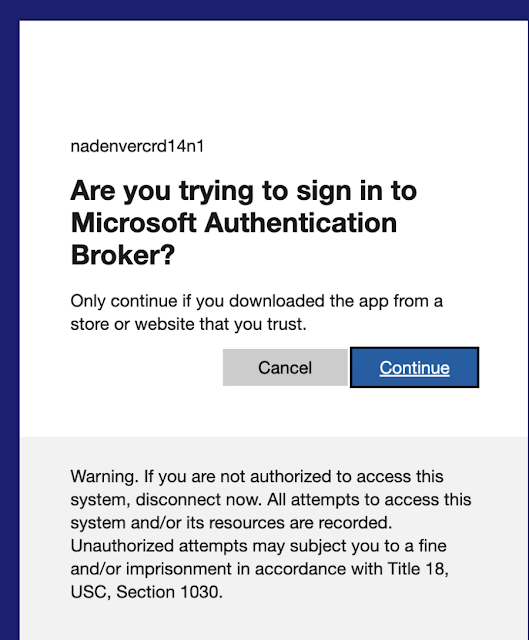
Login https://microsoft.com/devicelogin on the browser guest/Incognito mode, Enter the "Code" displayed on the Pad/Front Room Display individually and Enter the Room Account User-Id and Password.


Once you entered the Room Account credentials, the system will register the device into Microsoft Endpoint Manager.
Once the registration is successful the system will automatically sign in to Teams.

Note: - You need to repeat the same registration process for Neat Bar & Pad.


During initial discovery/setup, Pad and Bar/Bar Pro will also communicate over IP address on TCP ports 46000 and 46001. Once setup is complete, the Neat firmware will send encrypted communication over TCP port 8443.

Once you registered Neat Bar + Pad then the system will try to identify nearby devices using the above discovery method.


Once the system finds your nearby device, Select the Neat device and enter the code generated on the Room Display.


Find the Pairing Code on the Room Display.


Enter the Code.


Once the device is successfully paired, the room controller will swap into Room Panel.


In the next part, we'll look at how to manage and administer MTRoA devices on the TAC.

Thursday, September 22, 2022

Microsoft Teams Room on Android (MTRoA) deployment (Step-by-Step) Instruction - Part -2

In part -1 we discussed about the Teams Room overview and licensing requirement. If you didn't check the part - 1, pls check


In this article, we are discussing about the Site-Walk/Room Sweep, Network/Proxy requirement, Resource Accounts and Group based licensing.

Site-Walk/Room Sweep : -


Where do you need to install MTRoA device on the Small/Huddle, Medium, Larger conference room?

Based on your use case, find the certified Teams Room solution provided by multiple OEM vendor that meets your need


Once you choose your OEM vendor, make sure you have these components,

  • Dedicated Resource Account (On-prem/Cloud).
  • Display that supports CEC.
  • 2 Ethernet ports.
  • Proxy/Firewall rules are configured to allow Teams Media traffic.
  • QoS enabled on the network to optimize the Teams media traffic.
  • Local Internet breakout is preferable for better media quality instead of central location.
Resource Account -

Do you have on-prem (Hybrid) identity and managed everything in on-prem then you might need to create a room mailbox and migrate to cloud. If you are using cloud identity, you can directly create a resource mailbox in Exchange online and assign the required license.

Note: - Resource mailbox by default comes with sign-in blocked on the cloud, if it's on-prem account, it will be in disable state. You need to enable the AD account for Teams Room to sign-in/registration.

If you are in Hybrid mode, you can create a dedicated security group for Teams Room account licensing and sync to the cloud and assign the appropriate licensing. So, when you add new room account to the list, the Teams Room license will be provisioned automatically.


Once you have the resource account created, configure the calendar processing to automatically accept/decline the calendar invites based on the room availability.

e.g 
Set-CalendarProcessing -Identity "Resource Mailbox" -AutomateProcessing "AutoAccept" -AllowConflicts $false -DeleteComments $false -DeleteSubject $false -RemovePrivateProperty $false -AddOrganizerToSubject $false -ProcessExternalMeetingMesssages $true

If you need outbound dialing option from the room, you may need to get Microsoft Calling Plan add-on license or if you are using Direct Routing, you can configure the OnlineVoiceRoutingPolicy to make outbound calls.

Front Room Display supports CEC -

What is CEC (Consumer Electronics Control) ?

CEC is feature of HDMI that can switch automatically to an active video source from standby mode. If you don't have CEC supported display your room display might not automatically wake-up when someone walk-up to the room. Also, when sometime the display will not come online/disconnected when the MTRoW system reboot nightly that will cause usability of the room.

You can use EDID adaptors to overcome this issue.

Proxy/Firewall rules -

Using Proxy is not recommended in place to route traffic via proxy which will double encrypt the traffic which will cause poor performance. We need to bypass the proxy for MS Teams/O365 URLs. MTRoW/MTRoA doesn't support proxy authentication. You need to bypass the authentication.

Pls find official Microsoft documentation on the IP/URLs you need to whitelist.

Network Ports -

Get at least two network switch port 1- Video Collaboration Bar, 2- Room Console and make sure both ports are on the same VLAN/subnet.

Mount the Video Bar & Room Console -

Now, we have the device ready to install on the room.

Refer to the official documentation from Neat
Refer to the official documentation from Neat Pad


Note: - For this example, I'm using Neat, but it's similar setup for MTRoA devices.


Now, we prepared our environment for Teams Room on Android deployment. In the next part, we'll begin configuring the device. stay tune..


Tuesday, September 20, 2022

Teams Client Performance Improvement/Optimization


Microsoft upgraded the framework which improves the performance of Windows and Mac desktop users when they are interacting with the application. The upgraded Teams framework provides technical benefits including rendering the HTML tree faster, running JavaScript, and serializing arrays more efficiently.

The upgraded framework showed improvements across the board, especially for the P95 metric, which means that 95 percent of the time, the experience is better than the metric. Tracking performance metrics at the 95th percentile signals if improvements apply to most users, including those with low-end devices and poor network conditions.

Over the past two years, switching between chat threads is now 32% faster, and switching between channels is 39% faster. This leads to a more fluid experience that will keep you in the flow.


You can use Microsoft Teams Insider upgrade to validate the improvements,

Microsoft Teams Auto Attendant and Call Queue Reporting - Enhanced Report V3.0.4 released

Microsoft released Teams Auto Attendant and Call Queue Reporting PowerBI - Enhanced Report V3.0.4 with Corrected errors, improved call classification, data pipeline and added new legends to the report.


This PowerBI template provides 3 different reports for Auto Attendant, Call Queue and Call Queue Agents Timeline,
  • The Auto Attendant report shows analytics for calls coming into your auto attendants.
  • The Call Queue report shows analytics for calls coming into your call queues.
  • The Agent Timeline report shows a timeline view of agents being active in call queue calls.

CQD PowerBI Connector Installation


Assume you've already installed Power BI Desktop on your computer and that your account has the necessary permissions to access the CQD data pipeline.

Once you downloaded the PowerBI template, Open Teams Auto Attendant & Call Queue Historical Reports V3.0.4.pbit template file.

You'll be prompted to select the Data Source. Select the api.interfaces.records.teams.microsoft.com entry.

You'll be prompted to sign in with an account. Select Organizational account tab and then select Sign in.


How the data pipeline works?


Earlier versions used Call Quality Dashboard access to view the historical calls report and doesn't use the Call Quality Dashboard (CQD) data pipeline. 

If you need to give access to non-IT user you need to assign one of these permissions.

With V3.0.4 Microsoft using Voice Applications Analytics Collector (VAAC) service to report Auto Attendant, Call Queue and Agent Timeline reports.

Auto Attendant :-

This report will provide statistics on incoming call type (internal vs external), Avg.Calls in AA and Avg.user action and final call results e.g Call Disconnected, No user action, No operator, Disconnected with user action, call transfered to external/call queue etc..

Now even go deeper for user action to reach internal user either using DTMF/Voice on the directory search.


Call Queue: -

This report will provide statistics on incoming call type (internal vs external), how long user was on the queue before agent was answer the call or abandoned, Final call results, Call overflow etc..


Agent Timeline: -

There is not much changed on this report compare to earlier versions.


Thursday, September 15, 2022

Whiteboard Sharing/Collaboration is not working on Neat/Surface Hub Devices


Where does Microsoft Whiteboard canvas content is saved?


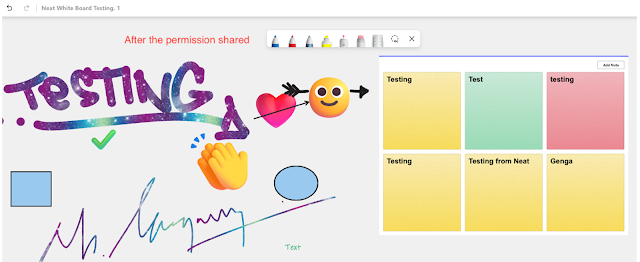
When you initiate Microsoft Whiteboard canvas on the Microsoft Surface Hub or Microsoft Teams Room on Android by default the data is stored in Azure. However, if you initiate a whiteboard sharing on the Teams client (Windows/Mac) the data will be stored on the user One Drive who is initiating the whiteboard. The Whiteboard content is saved and synced automatically to OneDrive for Business or Azure. So, the next time when you open the same whiteboard on the same device or any other device with the same login you will see all your content and you can start from where you are left over.

Where does my Whiteboard content store in OneDrive?


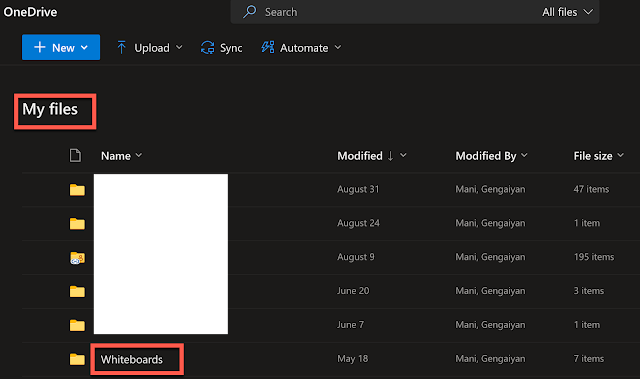
Microsoft migrated Whiteboard's default storage location from Azure to OneDrive starting in January 2022. Once the migration is completed (Admin must configure Teams meeting policy to enforce the default store location) you can access the data under the “One Drive\Whiteboard” folder.


If you collaborated with others, the data will be under "Shared".


Whiteboard is not starting on the Surface Hub/ Neat Board devices?


After Microsoft migrated to OneDrive for Business the SharePoint sharing policy takes precedence to produce the data, you might see errors like a blow,


You SharePoint admin can configure the Sharing policy to allow anonymous users to access the content with the below settings,

Set-SPOTenant -AllowAnonymousMeetingParticipantsToAccessWhiteboards On


After the change, you should be able to access the whiteboard without any further issues.


What is the anonymous user can access to the content means?


When you are sharing a whiteboard and inviting Surface Hub or Neat Boards, the device resource accounts will impersonate the presenter tokens to temporarily access the whiteboard during the meeting. Once the meeting is over the device account will not have access to the content.

Can external participants able to collaborate on the whiteboard in Teams meeting?


Yes, external users will be able to collaborate within Teams meetings, if your SharePoint admin enabled the below settings.

Set-SPOTenant -AllowAnonymousMeetingParticipantsToAccessWhiteboards On.

Can I disable external anonymous users accessing the whiteboard during the meeting?


If you want to allow only MTR devices within the organization, but you want to block the external attendees, your Teams Admin needs to configure “Meeting Settings” not to allow external users to have access to Teams meeting apps.


Microsoft Teams Room on Android (MTRoA) deployment (Step-by-Step) Instruction - Part -1

This is a multi-part series. we are going to look at how to configure Neat MTRoA device, but the same steps applies to other MTRoA devices as well.

Microsoft Teams Room Overview

Microsoft Teams Rooms provides a complete meeting experience that brings HD video, audio, and content sharing to meetings of all sizes, from small huddle areas to large conference rooms to improve the Hybrid meeting experience. You can use MTR to join 3rd-party meeting (Zoom, WebEx) for inclusive meeting experience.

Room peripherals to make great user experience

  • Peripheral devices - camera, microphone, speaker, mic pods (if larger room).
  • Display (Neat Bar - supports maximum two, Neat Bar Pro - Max 3 screen).
  • HDMI Output for content sharing.
  • Room Console - for managing meeting experience.
  • Microsoft Teams Room application (included on the Neat Bar OS).
Teams Room (Resource account) License requirement

Teams provides tow license models,

1. Microsoft Teams Room Basic.
2. Microsoft Teams Room Pro.

Microsoft Teams Room Basic -

If you have less than 25 rooms and you need very basic features like join meetings, share content and audio/video, 3rd party meeting direct guest join for Zoom & WebEx and basic inventory management through TAC then it's best fit for you.

Licensing Cost : -


Microsoft Teams Room Pro -

On top of basic, if you want more comprehensive meeting experience e.g Front Row, Content Camera, AI-Powered noise suppression features and better device management experience you need Room Pro license.

License Cost: -

Microsoft Teams Room Feature Comparison sheet : -


Wednesday, September 14, 2022

How to enable Teams Media logs by default in all enduser systems

What is Teams Media log and why it's important?

Media logs contain diagnostic data about audio, video, and screen sharing in Teams meetings. You need these logs when you open a support ticket with Microsoft to troubleshoot the media quality issues.

How to enable media logging?

There are two ways to enable media logging in Teams,

  • End User Configuration - Users can turn on/off media logging manually and restart the client before reproducing the issue.
  • Admin Configuration - Manage media logging settings through policy.

End User Configuration -

Users must enable it on the Teams client they logged in under the settings >General > Enable logging for meeting diagnostics (requires restarting Teams). This setting is specific to the endpoint, if the same user logged in on more than one system, they have to enable it on each system.


Admin Configuration -

Microsoft recently released a new PowerShell policy to enable media settings per user level or Global level.

Enable media logging settings for a single user -

Grant-CsTeamsMediaLoggingPolicy -Identity 'gmani@domain.com' -PolicyName Enabled

Enable media logging settings at tenant level -

Grant-CsTeamsMediaLoggingPolicy -Global -PolicyName Enabled

How to disable media logging that enabled tenant level?

Grant-CsTeamsMediaLoggingPolicy -Global -PolicyName $null

Once the policy is assigned it will be enabled by default and the user cannot disable it manually.


Collect the Media Logs on the Windows PC

  • The files will be available in the following locations:
    • %appdata%\Microsoft\Teams\media-stack\\\*\.blog
    • %appdata%\Microsoft\Teams\skylib\\\*\.blog

Collect the Media Logs on the Mac PC

  • The files will be available in the following locations:
    • ~/Library/Application Support/Microsoft/Teams/media-stack\\\*\.blog
    • ~/Library/Application Support/Microsoft/Teams/skylib\\\*\.blog

Log file nameDescription
Teams.msrtc-0-s1039525249.blogContains information related to the media stack. This includes channel status such as resolution, decoders and encoders used, and the number of frames sent and received, and camera and video-based screen sharing (VBSS) session status.
rtmcontrol.msrtc-0-2415069487.blogRecords information related to remote control actions, such as the time stamp when control is given, and mouse pointer information.
Teams_MediaStackETW-2-U-xr-U.etlRecords media stack trace events.
Debug-0-s2790420889.blogContains information related to the media agent, including rendering quality.
tscalling-0-2061129496.blogRecords events in the ts-calling API.