Saturday, April 29, 2023

Create offline meetings in Teams

When using Teams Calendar in the client to create a meeting/invite, an Online Meeting is automatically generated. However, with the release of MC535261, Microsoft now offers the option to create an Offline Teams meeting.


If you use Microsoft Teams for your work you might want to use it for your personal appointments and breaks as well. This way, you can keep track of your schedule and avoid conflicts with your professional commitments. However, you might not want to create online meetings for these events, since they are not meant to be joined by others. 


To create an offline event in Teams, you need to turn off the online toggle when setting up calendar events in Teams Calendar. Here are the steps to do so:


1. Open Microsoft Teams and go to the Calendar tab on the left side of the app.

2. Click on New meeting in the top right corner or select a range of time in the calendar.

3. Fill out the details of your event, such as the title, date, time, and attendees (if any).

4. Uncheck the box next to the Online meeting.

5. Click on Save.


You have now created an offline event in Teams that will not have a meeting link, a chat thread, or any other online meeting features. You can still edit or delete the event from your calendar if needed.


Creating offline events in Teams can help you manage your personal time and avoid distractions from online meetings. You can use this feature for personal appointments, lunch break slots, and more. 

How to Bulk Unassign Teams Policy from user profiles

There are scenarios where you need to unassign the policies assigned to user profiles.


That's why Microsoft Teams has introduced a new feature called Bulk Unassign Teams Policy. This feature allows you to unassign a specific Teams policy from multiple users in one go. You can use this feature to quickly and easily manage your Teams policies and ensure that your users have the appropriate settings and permissions for their roles.


Bulk Unassign Teams Policy is a useful and convenient feature that can help you save time and effort when managing your Teams policies. However, you should use it cautiously and ensure you understand the implications of unassigning a Teams policy from multiple users. 

  • Select Manage Users
  • Select "Unassign policies in bulk" under Action in the top right corner.


Unfortunately, at this time, the bulk unassign policy has certain limitations and does not provide support for all available policies. See the below list of supported policies.


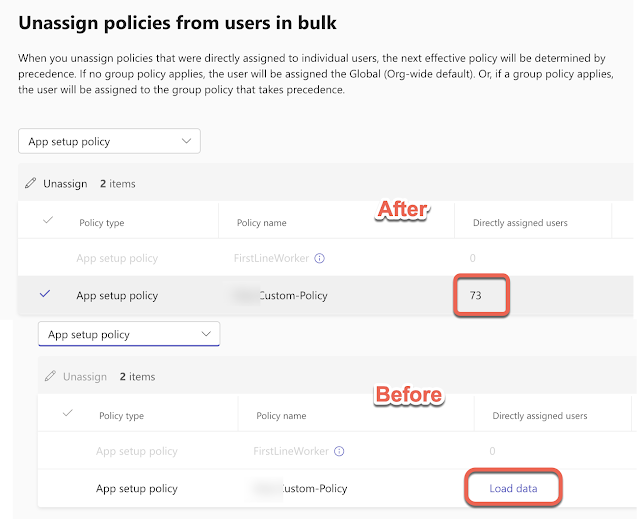
In this example, I'm using an App setup policy. The Bulk Unassign Teams Policy feature will remove the selected Teams policy from the selected users and apply the global (Org-wide default) policy instead. 

Once you select the policy type, it will show you all the custom policies created.

Select the policy and click "Load data" under directly assigned users to see how many users were impacted.


Select the policy you want to unassign from user profiles and click "Unassign"


Click "Confirm"


You can check the status of the bulk unassignment operation in the Bulk assignment history page from the Home page.


The activity page will give more information about the bulk operation status.


You can also do this action through PowerShell as well.

Find how many users have specific custom policies assigned. Store the value of the variable.

$PolicyAssigned = Get-CsOnlineUser -ResultSize unlimited | Where-Object {$_.TeamsAppSetupPolicy -eq "App Custom Policy"}

Find the no.of users

$PolicyAssigned.Count

Unassign the Policy

Foreach ($User in $PolicyAssigned.Sipaddress){

Grant-CsAppSetupPolicy -Identity $User -PolicyName $Null

}


Sunday, April 23, 2023

Update Microsoft SIP interfaces TLS certificates from Baltimore CyberTrust Root to DigiCert Global Root G2

Microsoft 365 is changing the TLS certificate used for Meetings, Messages, Telephony, and Voice and Video services. The current Baltimore CyberTrust Root is expiring in May 2025.

Affected endpoints include all Microsoft SIP endpoints used for PSTN traffic that utilizes TLS connectivity. The transition to certificates issued by the new CA will begin in July 2023.

Microsoft is making this move because DigiCert is widely trusted by operating systems including Windows, macOS, Android, and iOS and browsers such as Microsoft Edge, Chrome, Safari, and Firefox.

Suppose you are using Direct Routing in your data center or hosted SBC environment, which was used to have Baltimore CyberTrust Root. In that case, it's time to update the root certificate on the SBC since it is likely that your SBC has a certificate root store that is manually configured and needs to be updated. 

If the certificate is not updated on the SBCs that do not have the new Root CA in their list of acceptable CAs will receive certificate validation errors, which may impact the availability or function of the service. 

You can download the DigiCert root certificate from https://cacerts.digicert.com/DigiCertGlobalRootG2.crt


Thursday, April 13, 2023

Major Update for the New Webinar Experience in Microsoft Teams

If your organization used Microsoft Teams Webinar basic features that are controlled via Teams Meeting Policies for event registration and attendance report? It's time to transition to the new webinar experience. 

Webinar basic functionality -

Earlier, Webinar basic functionality is managed on the Teams Meeting Policies (Set-CsTeamsMeetingPolicy). The webinar scheduled with the old experience will continue to work.

New Webinar functionality -

The new webinar experience uses meeting registration and many new features, including,

  • Dedicated event and registration page for your webinar
  • Co-organizers
  • Presenter bios on the event page
  • Registration status overview and management

All newly created webinars will have a new experience. The new experience is controlled by the Teams Event Policy (Set-CsTeamsEventPolicy).

Implement new webinars experience -

Currently, you can manage Webinar features via PowerShell Only.

Turn-On Webinar -


Set-CsTeamsMeetingPolicy -Identity Global -AllowMeetingRegistration $True -AllowWebinars $Enabled --EventAccessType Everyone


Webinar Experience migration from Basic to New Enhanced 
  • AllowMeetingRegistration - will only control whether the required registration option is available in Teams meetings. The required registration option's availability does not impact the new webinar experience.

  • AllowWebinar - will only control whether there will be a webinar entry point with the new webinar experience under the new meeting dropdown in Teams Calendar.


Wednesday, April 12, 2023

Enhancement to Microsoft Teams Call Queue and Auto Attendant to change the greetings and announcements by authorized users

If you use Microsoft Teams for your business communication, you may want to customize the greetings and announcements your callers hear when they dial your phone number. For example, you may want to update the welcome message, the menu options, the hold music, or the out-of-office message. Every time a change needs to be made, the user has to open a ticket with the Helpdesk team to update. It's a manual & time-consuming process, and you need to have the appropriate permissions in Microsoft Teams. You need to be either a global administrator, a Teams service administrator, or a Teams Communications administrator.

To overcome this challenge and reduce the IT Helpdesk calls, Microsoft released a new feature in TAC to configure the Call Queue and Auto Attendant to assign the authorized user to change the greetings and announcements in Microsoft Teams Call Queue and Auto Attendant by authorized users.

Call Queue and Auto Attendant are two features of Microsoft Teams that allow you to manage incoming calls more efficiently. 

  • Call Queue lets you create a queue of callers who are waiting to speak to someone from your team. You can assign agents to answer calls from the queue, and set up greetings, music, and overflow options for the callers.
  • Auto Attendant lets you create a phone menu system that directs callers to different destinations based on their choices. You can set up greetings, menu options, dial-by-name directories, and transfer rules for the callers.
How to set up the Authorized user on the AA/CQ?

  • In the left navigation pane, click on Voice > Call queues or Voice > Auto attendants, depending on which feature you want to modify.
  • Select the call queue or auto attendant that you want to edit, and click on Edit.

  • In the Edit call queue or Edit auto attendant page,
  • Select Authorize users section and click Add and type the user who is authorized to update the greetings.


Voice Application Policies -

The Teams voice application policies are a way to control the features and settings of voice applications in Microsoft Teams. Voice applications such as AA & CQ.

  • In the left navigation pane, click on Voice >Voice applications policies.

  • Create/Modify the policy and enable AA/CQ settings based on scenarios.
  • Assign the policy to required users.


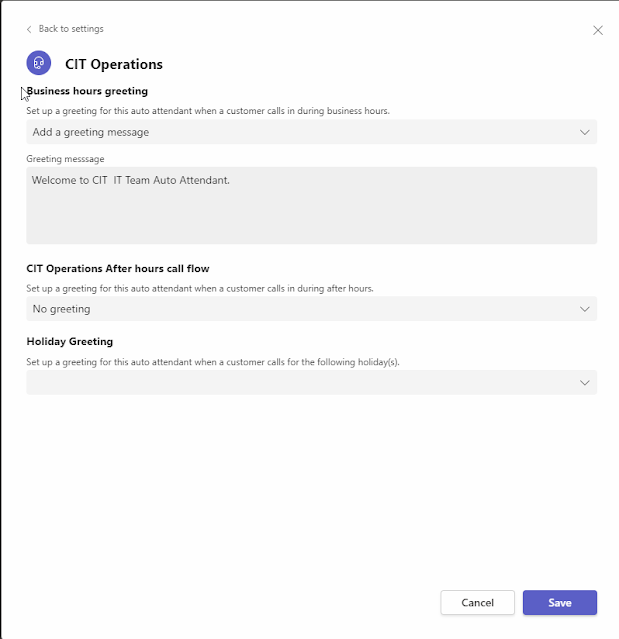
Once the inband provisioning is pushed/synced. On the Teams client, Select the Setting and Calls tab.

Select the Call Queue or Auto Attendant that you want to modify the greetings,


For Auto Attendant -

Based on your Voice application policy settings, you can modify the Business hour greeting, After hours greeting, or holiday greeting.


For Call Queue -


In Call Queue, you can Opt-In/Out of the Call Queue, change the greeting and music on hold file etc.


Monitor Microsoft Teams Audio quality for in-progress meetings

Microsoft recently released real-time monitoring of audio for in-progress Teams meetings.

Currently, the rule only applies to Teams Audio when one or more conditions are met e.g. Packet Loss greater than 5%, Jitter greater than 30 milliseconds, or RTT greater than 500 milliseconds.


You can define the mentoring settings threshold before the alert is sent. 3 levels of mentoring threshold,

  • Notification threshold - Set the minimum % of the time that any above audio conditions must occur before the alert is sent e.g minimum 30% to 100%.
  • Monitoring Window - set the amount of time audio must be monitored before the alert is sent e.g 1 min to 5 min.
  • Notification waiting period - set the waiting period between the monitoring windows before sending another alert 5 min incremental up to 20 min.


Once you defined the monitoring threshold add your users whom you want to do a proactive monitoring 


You can get the monitoring alerts in a couple of ways,

  • Teams Channel - Either you can get your own channel and configure it, or you can use the default alert channel.
  • Webhook - If you have an incoming webhook, you can configure the Webhook URL.


User Experience/Alert -

When the user experiences the issue, the alert will be sent to Webhook or Teams Channel. The Teams also automatically starts for each user's real-time meeting data.

The alert includes what was causing the poor audio quality and when you click on "View details" it will take you to the TAC and you should be able to look at the entire call stats.


Tuesday, April 11, 2023

Recent Updates to Microsoft Teams Admin Center

Microsoft released an update to the Microsoft Teams admin center to simplify the left navigation, reduce clutter, and improve the administrator experience.


This feature will hide less-used left navigation menu items by default and allow administrators to pin them to the default view if they choose. 


Customize the TAC Navigation pane -

  • Login to Microsoft Teams Admin Center (https://admin.teams.microsoft.com)
  • Click "Show pinned" items or ignore the customized menu.


Right-click on the required menu item and click the "Pin icon". This way the navigation will be tailored to the specific needs of each administrator, making it faster and easier for them to find the information they need.


Next time when you log in to TAC you will have your customized menu.

Monday, April 10, 2023

Microsoft Teams Room on Android update 1.096.2023031201


Upgrade Microsoft Teams Room on Android Update -

Microsoft Teams Rooms on Android is a device solution that transforms your meeting spaces into a rich, collaborative experience. With Teams Rooms on Android, you can easily join and manage Teams meetings with one-touch join, enhanced audio and video quality, content sharing etc.


Microsoft Teams Rooms on Android devices receive regular updates that bring new features and improvements to the user experience. In this blog post, we will guide you through the steps to upgrade your Teams Rooms on Android devices to the latest update and enjoy the benefits of the new functionalities.


The latest update for Teams Rooms on Android is Update 1 2023, which was released in February 2023. This update includes several enhancements that make your meetings more productive and engaging. 


To upgrade your Teams Rooms on Android devices to the latest update, you need to follow these steps:


1. Sign in to Microsoft Teams admin center by visiting https://admin.teams.microsoft.com.

2. Navigate to Teams devices and then select Phones, Displays, Panels, or Teams Rooms on Android.

3. Select one or more devices and then select Update.

4. Under Firmware auto-update, select one of the following:

   - General: The device will receive the update as soon as it is available.

   - Early adopter: The device will receive the update before it is available to the general public. This option is recommended for testing purposes only.

   - Late adopter: The device will receive the update after it has been available to the general public for some time. This option is recommended for devices that require more stability and less frequent changes.

5. Select Update.


You can also schedule updates for specific days and times by selecting Schedule Updates under Device settings.


Note: Assigning devices to an automatic update phase is a Teams Rooms Pro feature for Teams Rooms on Android devices. Devices with a Teams Rooms Basic license will be assigned to the General phase. Any pre-configured phase will be maintained, and no further change will be allowed.

Features released on Microsoft Teams Room on Android update 1.096.2023031201 -

  • Join Teams meeting with ID – available in all Microsoft Teams Rooms licenses

  • Single tap ad hoc meetings – available in all Microsoft Teams Rooms licenses

  • Room reservation extension – only available in Teams Pro licenses

  • Front row layout – available in Teams Standard, Premium, and Pro licenses

  • Meeting chat in Gallery, Large gallery, and Together mode – only available in Teams Pro licenses

  • HDMI connect auto share controls – available in all Microsoft Teams Rooms licenses

  • HDMI audio share – available in all Microsoft Teams Rooms licenses

  • Collaborative annotations support – available in all Microsoft Teams Rooms licenses

  • Teams Premium watermark-enabled meetings support – available in all Microsoft Teams Rooms licenses