Wednesday, August 16, 2023

[Improvements] The Teams Calendar now has the ability to modify meeting invitations prior to sending them to attendees, improving its functionality.

Recently, Microsoft has made a significant update to the Teams Calendar Functionality. Prior to this update, when creating an invite using Teams Calendar, users had to send the meeting invite first and then go back to modify the meeting options. However, with the new update, users can now modify the meeting options during the initial invite creation process. 


Enhancements have been made to the Teams Calendar, allowing for modifications to be made to meeting invitations before they are sent to attendees. This significantly improves the functionality of the calendar and enhances the overall user experience.


This option is available for both Windows/Mac thick clients and browser clients.


[Change] Customize your Microsoft Teams Tag tenant-level settings to your preferences!

Tagging in Microsoft Teams is a feature that allows you to:


- Create custom groups of people within a team or channel

- Mention or message those groups using @tags

- Manage tags and assign them to members

- Use tags to filter chats and notifications.


IT Admins have an option in TAC on how you want to assign permission to your organization's users to manage the tag. Either you can configure it to allow only Teams Owner access to tag management on the Teams Group/Channel, or you want your members to also want to manage it.


Currently, the default setting is "Teams Owners" only, and there is a change coming next month to change the default settings to the "Team Owners and Members" option.

If you have already selected your Tag Management settings to "Team Owners and Members", your tenant will not be impacted by this change. 

However, if you have not made any changes to your Tag Management settings, Microsoft Default settings will be applied to your tenant. Currently, the Microsoft Default settings map to the "Team Owners" value, but this update will modify it to "Team Owners and Members".


In my opinion, it is highly advisable and considered to be standard procedure to maintain responsibility and control within the purview of the Team Owner. This ensures that they possess the necessary knowledge and capability to effectively oversee and direct their team.

If the owner wants to grant additional access to their team members, they have the option to adjust individual team-level settings instead of relying on IT admins or Microsoft to make changes at the tenant level. If you prefer to maintain Team Tag management under the "Team Owner," it's time to manage any necessary alterations.

How to change the settings in TAC?

  • Sign in to Microsoft Teams admin center at https://admins.teams.microsoft.com.
  • In the left navigation pane under the Teams section, select Teams settings.
  • Under Tagging section, select your preference for "Who can manage tags"


Monday, July 17, 2023

Dynamic Emergency Calling Support on Microsoft Team on Web client

Emergency calling is a crucial feature for organizations to facilitate 911 calls, and it is mandatory by law in some countries. This feature is currently available on desktops (Windows & Mac) and mobile devices. Microsoft has now extended this functionality to web clients as well.

The user has an option to manually enter the emergency location before making 911 calls.

  • Login to Teams web client https://teams.microsoft.com
  • Select "Calls" app
  • Under Device settings, click "Add Location"


If you provide your home or office location address, our system will check if it's available in our LIS database and display the full address for you automatically.

If your address doesn't appear automatically, you can manually enter it.


Sunday, July 16, 2023

Enable Face & Voice Enrollment on Windows Desktop for People Recognition in Teams Rooms

Microsoft is releasing the Cloud IntelliFrame AI feature for Teams room attendees to be visible and easily identifiable, making it easier to connect and collaborate with colleagues no matter where they are. 

Please refer to this article for more information https://m365community.blogspot.com/2023/07/the-cloud-intelliframe-ai-feature-will.html

For Cloud IntelliFrame to identify the users in the room, Microsoft released Voice and Video recognition features in the endpoint for users to enroll/configure the profile. This feature is available for Microsoft Teams Rooms Pro license customers.

The user enrollment feature is by default disabled on the meeting policy, and the IT admin needs to enable it on the custom or global policy.

Microsoft Teams Rooms and certified Teams cameras use IntelliFrame technology to create an inclusive and immersive meeting experience for both remote and in-room users. One of the key features of IntelliFrame is its people recognition capability, which employs AI to ensure speakers are properly identified.

Intelligent Cameras use recognition technology provided by Microsoft to identify individuals present in a Teams meeting room, providing real-time identification. Participants who have enrolled their face with the Microsoft Teams desktop client will have their name displayed on their videos and in the meeting roster. Those who have not enrolled will be identified as "Guests". Name labels will be shown on the meeting stage and in the roster.

Teams rooms on Windows will need to have cameras that support IntelliFrame, such as the Yealink SmartVision 60 and Jabra PanaCast 50. Other cameras will be published on the Microsoft Learn site as they become available.


Enable Voice and Video Recognition enrollment in Teams Meeting Policy -

Set-CsTeamsMeetingPolicy -Identity "CustomMeetingPolicyName or Global" -EnrollUserOverride Enabled


Once the Policy has been replicated the enduser can see the "Get Started or "Create voice profile" option under Recognition tab in Settings page.

Read the below statement given by Microsoft to record your voice to identify you automatically by Cloud IntelliFrame feature during the Teams Meeting.


Once you finish the Voice recognition, you will get the "Face recognition" option.


The Cloud IntelliFrame AI feature will soon be available on Microsoft Teams Room for Windows.

What is Cloud IntelliFrame in Teams Room?


Meetings have become more complex and challenging in the age of remote work. That's why Microsoft & Vendor is releasing the Cloud IntelliFrame, a cutting-edge AI feature designed to enhance the online meeting experience. With this innovative AI technology, participants in Teams Rooms meetings can enjoy clearer visuals of individuals present in the room. This intelligent video feed ensures that in-room attendees are visible and easily identifiable, making it easier to connect and collaborate with colleagues no matter where they are.


In hybrid meetings, a smart video feed is generated by zooming into the faces of the attendees and eliminating any distractions in the background. This allows for clearer visibility of facial expressions and gestures, thus enhancing collaboration. Additionally, it promotes equality among participants as everyone is visible and audible.


Supported Client and License requirements-


The Cloud IntelliFrame feature will soon be available only for Microsoft Teams Rooms on Windows with a Pro license and it can be accessed on Microsoft Teams Desktop for both Windows and Mac endpoints.


Hardware requirements for IntelliFrame AI

For now, only the below hardware supports the AI IntelliFrame feature,

  • AVer CAM520 Pro
  • AVer CAM520 Pro2
  • BRIO 4K Stream Edition
  • EagleEye Cube USB
  • HD Pro Webcam C920
  • Jabra PanaCast
  • Logi Rally Camera
  • Logitech BRIO
  • Logitech ConferenceCam CC3000e
  • Logitech MeetUp
  • Logitech Webcam C925e
  • Logitech Webcam C930e
  • Microsoft® LifeCam Studio
  • Polycom EagleEye IV USB Camera
  • PTZ Pro 2
  • PTZ Pro Camera
  • ThinkSmart Cam
  • Yealink UVC30
  • Yealink UVC34
  • Yealink UVC50
  • Yealink UVC80
  • Yealink UVC86

The IntelliFrame feature will be available on MTRoW devices with specified vendor hardware cameras starting in mid-August. This feature will be automatically enabled upon release. Only Windows & Mac teams clients are supported, Web and mobile devices are not supported.

There is an icon located in the top right corner of the Room video feed that shows that Cloud IntelliFrame is being used.


If you want to disable this feature in the meeting room you can do so by accessing the in-meeting settings on the console. This will switch the Room back to the standard view, and all online attendees will be able to see the standard view from that Room.


Users have the option to disable IntelliFrame on their end to access the standard room view.

Camera/IntelliFrame feature Limitation


The IntelliFrame feature can accommodate a maximum of 9 users in a room. When a new user enters, the camera will automatically switch to the standard view until the person has settled down. This will be a challenge if your room is equipped with a glass door and an open area. For the best experience use this feature in huddle/small and medium room spaces.

How to disable/Opt-Out IntelliFrame feature

You can disable the IntelliFrame feature via the XML configuration file,

<CloudIntelliFrame>False</CloudIntelliFrame>


Thursday, July 13, 2023

New telemetry signals are captured on Windows MTR systems to enhance the monitoring

The Microsoft Teams Room Pro portal agent is gathering a fresh batch of telemetry data to enhance the monitoring of Microsoft Teams Room on Windows. This will help improve the performance and availability of the room.


Nightly Reboot Disabled - If the Teams Rooms device has been running continuously for two or more days and the nightly Reboot task is disabled, it could affect the scheduling of updates or the effectiveness of remediations by the agent.

Windows OS Activation status - You may receive a notification if your Windows operating system shows a status that doesn't match your licensed version. This could mean that the activation process wasn't completed properly. If you're rebuilding the MTRoW or creating a custom Windows image, this notification can alert you if activation fails.

Time Drift - We have detected a time difference between the current time (UTC) on your MTR Windows device and the time (UTC) of the Teams Rooms Pro Management service. This can lead to problems with signing in, updates failing, or meetings not showing up on your device calendar. To fix this, we will restart the time service and check if the time difference has been resolved.

Windows Server Update Service (WSUS) enabled - According to the agent, there haven't been any recent updates installed through Windows Update, and it has identified an already existing WSUS configuration on the device.

Disk Health - If the primary drive has excessive disk wear or shows SMART errors, a warning will be triggered indicating that the device may fail soon.


Discover how to modify the configurations for Microsoft Teams Rooms on your Android MTR Devices.

Excited news that the Pro Management portal now offers the ability to directly edit Android device settings.


To access this feature, simply navigate to the Settings tab in the device's detail panel and select the "Configuration profile" option. From there, you can easily view and assign profiles that have been previously configured in your tenant.


Please note that device profiles can only be configured on MTRoA devices and are not supported on Teams Room Panels.


Restrict the Teams Public Webinar Join concurrent device limitation

In order to meet security standards, certain regulatory companies have deemed it necessary to limit the number of devices that can participate in a Teams Webinar meeting at the same time.


When attending public webinars, people can use their registration link to join from multiple devices. Additionally, they can share the same link with others who haven't registered yet so they can also attend. Which leads to security issues.


In August 2023 (MC638135 with Microsoft 365 Roadmap ID 147098), Microsoft will introduce a new feature that limits the number of devices that can join a meeting concurrently. Following the update, attendees will only be able to join using the same meeting link on up to three devices in a row during webinars.

Tuesday, July 11, 2023

Schedule a regular Logitech Video Conferencing System reboot

Logitech has recently launched a firmware update, CollabOS-1.9.544, for the Rally Bar and Rally Bar Mini devices. This firmware update includes many new features, one of which I am particularly interested in: the "schedule reboot" function that I have been eagerly waiting for.


Sometimes, the video collaboration bar experiences performance issues that can be resolved by manually rebooting it or using the Sync portal. However, with this release, you can now schedule a regular reboot at a time that is convenient for you.


If your device has CollabOS 1.8 or an earlier version, you will notice that the "schedule reboot" option is grayed out. However, you can manually reboot the box.


If your device has version 1.9.544 or higher, you will have the option to "Schedule reboot."


When you restart the device, you have the option to either wait until the ongoing meeting is over, reboot it regardless, or simply skip the reboot if it's currently being used.


If you're looking to assess device behavior and establish an SOP process, scheduling a reboot for each device individually can be helpful. However, if you're managing a large number of devices, this method can be inconvenient. In such cases, opting for bulk device management to schedule a reboot by device type is a more efficient option.


Unfortunately, Logitech does not offer a calendar option to select a specific date for scheduling a reboot. Instead, you can choose the desired day for the weekly reboot under the "reoccurrence" option.


Monday, July 10, 2023

Upgrade Logitech Sync App directly from Sync Portal

Are you currently utilizing the Logitech Sync App for Logitech video conferencing device management? If so, you may be curious about upgrading to the latest version. Luckily, we're here to guide you through upgrading directly from the Sync Portal without the need for manual downloading and installation. Keep reading to learn more.


The Logitech Sync App is a useful software application that enables you to monitor, control, and update your Logitech video conferencing devices from one convenient interface. You can access the Sync App on your computer or via any web browser through the Sync Portal.


Sync Portal is a cloud-based service that enables you to access additional features when connected to your Logitech Sync App. With Sync Portal, you can manage your devices remotely, receive analytics and alerts. Additionally, it allows you to update Logitech Sync App on your computer or multiple computers simultaneously.


In order to upgrade the Logitech Sync App directly from the Sync Portal, please follow these steps:


1. Log in to Sync Portal https://sync.logitech.com/ using your Logitech account credentials.

2. Go to the Meeting Rooms and select the Inventory tab and select the computer that has Logitech Sync App installed.

3. Click on the Actions button and select Upgrade Sync App from the drop-down menu.

4. Confirm the upgrade by clicking on Upgrade Now or Scheduling the upgrade at your preferred time.

5. Wait for the upgrade process to complete. You can monitor the progress on the Devices tab or on the Notifications tab.

6. Once the upgrade is done, you will see a green check mark next to the computer that has been upgraded.

7. You can now enjoy the latest features and improvements of the Logitech Sync App.


To ensure that your video conferencing devices are always up-to-date and secure, upgrading the Logitech Sync App from the Sync Portal is a convenient and efficient option.


To upgrade your devices, utilize the filter option to sort and display only the necessary ones.


The Microsoft Graph PowerShell SDK 2.0 has been released as a generally available version.

The latest version of Microsoft Graph PowerShell SDK offers a plethora of new and upgraded features. It's advisable to upgrade your current PowerShell SDK module to version 2.0 and make the most of these features.


What has changed?

  • When using Graph PowerShell SDK 1.0, it is necessary to manually switch the API profile by utilizing the command Select-MgProfile -Name beta or V1.0 when needing access to either version. With the new upgrade (2.0) Microsoft is depreciating Select-MgProfile to switch between V1.0 and beta. 

It's important to note that Connect-MgGraph will automatically connect to V1.0 by default.

  • To utilize beta API commands, it is necessary to install a separate Beta PowerShell Module by running the command "Install-Module Microsoft.Graph.Beta -AllowClobber".

  • In the same profile, you can access the V1.0 and beta commands. This improves the error handling.
  • With MgBeta, every beta command has its unique syntax, and the current syntax will remain unchanged with the command prefix being the "mg" prefix. The user can easily navigate through the commands without any confusion.


# For Microsoft Graph v1.0
Install-Module Microsoft.Graph -AllowClobber

# For Microsoft Graph beta
Install-Module Microsoft.Graph.Beta -AllowClobber


Install Beta module-


With the latest update, it's now possible to use both v1.0 and beta commands in a single script without the hassle of reloading the entire module.


Release notes -

  • Adds Managed identity support.
  • Adds client secret credentials support.
  • Adds support for both current user and local machine certificate store lookup. Priority is given to certificates in CurrentUser store if two identical certificates are present in both stores.
  • Adds environment variable based authentication support.
  • Adds paging support to delta commands.
  • Adds dedicated count commands for supported APIs.
  • Adds logging of MSAL events to debug stream when using Connect-MgGraph.
  • Adds parameter completer for -Period in Reports module and -ConsistencyLevel parameter.
  • Adds preview support for WAM.
  • Fixes escaping of -Filter values.
  • Fixes handling of claims challenge.
  • Fixes wrongly pluralized command names.
  • Fixes date assignment in Reports module.
  • Makes enhancements to -WhatIf on supported commands.
  • Makes improvements to how service errors surface to the error stream.
  • Improves API coverage by adding support for previously unsupported APIs.
  • Resolves assembly conflicts with common modules.
  • Drops the use of profiles to switch between API versions. Service modules are now split by API version.
  • Drops support for -ForceRefresh on Connect-MgGraph.
  • Renames beta command names from <Verb>-Mg<Noun> to <Verb>-MgBeta<Noun>.
  • Renames DeviceManagement.Enrolment module to DeviceManagement.Enrollment.
  • Moves directory role and entitlement management commands from DeviceManagement.Enrollment to Identity.Governance module.
  • Changes beta namespace from Microsoft.Graph.PowerShell.Models.<Entity> to Microsoft.Graph.Beta.PowerShell.Models.<Entity>.
  • Changes -AccessToken type on Connect-MgGraph from String to SecureString

Monday, June 26, 2023

[Update]Microsoft Teams Room on Windows June Update - 4.17.51.0

There is a significant update available for Microsoft Teams Room on Windows, which introduces numerous new features and improvements.

  • The manual installation of Teams Room Pro portal agents is no longer necessary. The device enrollment process has been simplified and devices are now automatically installed and registered to the Pro portal.

  • The support to enhanced custom home screen background.

  • Supports SIP/H323 1:1 calling via certified CVI providers.

  • MTRoW now offers the option to select and enable the together mode feature for everyone.
  • Net Promoter Score survey at the end of some meetings


Release notes for Microsoft Teams Rooms - Microsoft Teams | Microsoft Learn

Monday, June 19, 2023

Enable Room Capacity or Occupancy notification in Teams Room Systems

If you are using Teams Room devices in your organization, you might want to enable the room capacity notification feature. This feature allows you to set a maximum number of people that can safely occupy a meeting room, and display a warning message on the device screen when the limit is reached or exceeded. This can help you comply with social distancing guidelines and prevent overcrowding in your meeting spaces.


To enable the room capacity notification feature, you need to follow these steps:


1. Sign in to the Microsoft Teams admin center with your global admin or Teams service admin credentials.

2. Navigate to Devices > Teams Rooms.

3. Select the device that you want to configure, and click Edit.

4. In the Settings tab, scroll down to the Room capacity section.

5. Toggle on the Enable room capacity notification switch.

6. Enter the maximum number of people that can safely occupy the room in the Room capacity field in Exchange.

7. Click Save.

Once you enable the room capacity notification feature, the device will display a message on the screen when the room is at or above the capacity limit. The message will say "This room is at capacity. For your safety, please consider joining from another location." The message will also show the current number of people in the room and the maximum capacity limit.


To receive notifications about capacity, you can activate the feature through XML configuration on Windows MTR.


Microsoft Teams Room on Android -

To ensure the proper functionality of your MTR solution with Logitech Camera, kindly set the room capacity in the Logitech Sync portal.


Please specify the capacity of the room in the Exchange resource account.


Please note that in order to count the number of people in a room, an AI-capable camera is required. It is recommended that you check with your camera vendor to confirm that this feature is supported by your camera.


Saturday, June 17, 2023

Set your work hours and location in Outlook to easily communicate your availability

With the rise of hybrid work environments, it's becoming more common for individuals to work remotely and have flexible schedules. However, this can pose a challenge when it comes to coordinating meetings and collaborating effectively with others. To address this issue, Microsoft has integrated new features into Outlook and Teams that empower users to set their work hours and location for each day of the week. By doing so, users can easily communicate their availability and preferences to colleagues and managers, and also discover the optimal times to schedule meetings based on their work location.

How to set the work hours and location -

Note: - Currently, this feature is supported only on Outlook on Web.

In Outlook, it's simple and convenient to set up your work hours and locations. Just head to the Settings menu on Outlook for the web, select "View all Outlook settings," navigate to the "Calendar" option on the left-hand side menu, and click on "Work hours and locations".


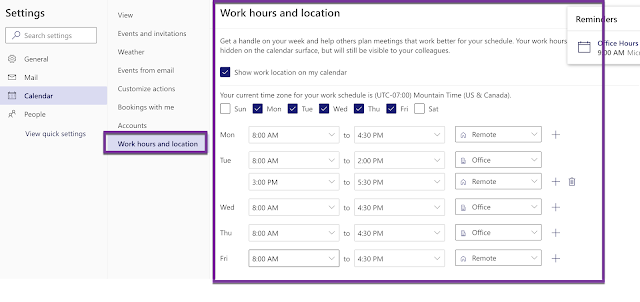
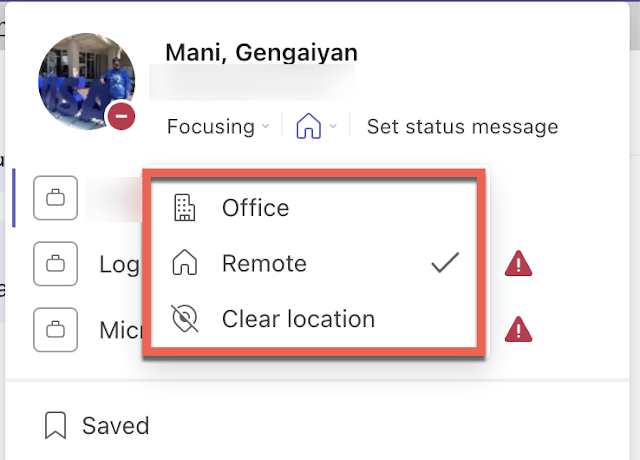
Users can choose which days they work, what time they start and end their workday, and whether they work remotely or in the office. Users can also change their work location for a specific day if their schedule changes. These settings will be reflected in both Outlook and Teams, and will also update the user's status and presence.

When scheduling a meeting, pertinent details such as work hours and location will be displayed.


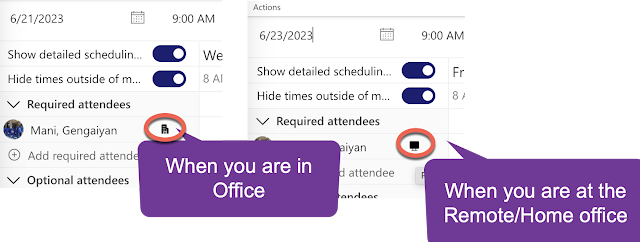
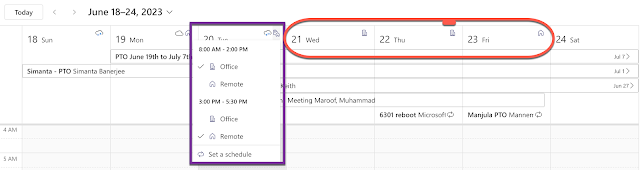
One of the benefits of setting work hours and location in Outlook is that it helps users schedule meetings more efficiently. When users create a meeting event in Outlook on the web, they can use the Scheduling Assistant to see the work location of the attendees, as well as their availability based on their work hours. This way, users can avoid scheduling conflicts and choose times that suit everyone's preferences. Users can also view the work location of others on their profile cards, which can help them understand where they are working from and how to reach them.


Setting work hours and location in Outlook is not only helpful for users, but also for their teams and organizations. By sharing this information, users can foster a culture of transparency and trust, as well as respect each other's boundaries and work-life balance. Users can also support their managers and leaders in planning and managing resources, projects, and goals more effectively.


Tuesday, June 6, 2023

How to delay Windows 11 upgrade on the Teams Room on Windows devices

Microsoft has announced that Microsoft Teams Rooms on Windows that meet the eligibility criteria will be updated to the Windows 11 22H2 update once Teams Room App 4.17 is installed. 

To ensure that your network/firewall/proxy configuration supports the Windows 11 upgrade, please refer to the instructions on upgrading Teams Room app 4.16.134 through the Teams Room Pro portal.


https://m365community.blogspot.com/2023/05/update-teams-room-pro-portal-for-manual.html

https://m365community.blogspot.com/2023/05/windows-11-support-for-teams-rooms-on.html


If you're experiencing network, proxy, or firewall problems, or if you want to postpone your eligible Teams Room device's Windows 11 upgrade, you can follow these steps to delay the upgrade.

How long can you delay the upgrade?

You can delay the upgrade until November 20,2023.

How to delay the upgrade?

To delay the upgrade, you need to set the HKEY_LOCAL_MACHINE\SOFTWARE\Microsoft\PPI\SkypeSettings\CBU11 value to 1 (DWORD).

Is there any timeline for setting these delayed upgrade settings?

You must set the above registry value before June 20, 2023.

Can I remove this registry for the staged upgrade?

Yes, you can remove the registry to resume the upgrade.


Thursday, June 1, 2023

Improvement to Device Registration Process for Microsoft Teams Rooms on Windows for Pro Management Portal

Current MTR Pro portal agent registration-

  • Log in to http://portal.rooms.microsoft.com as Administrator
  • On the left navigation bar of the Microsoft Teams Rooms Pro Management portal, expand Settings and select General.
  • Under Enroll a room, select Download the installer to download the monitoring agent software.
  • Copy the installer file to a USB drive and plug it into the MTR device.
  • Run the installer file and follow the prompts to install the monitoring agent software.
  • Restart the device and wait for it to connect to the Pro Management portal.
  • You can verify the enrollment status of your device on the Rooms tab of the portal.


Improvement to the Device Registration Process


The enhanced device registration process for Windows-based Teams Rooms devices on the Pro Management portal is great news for IT admins. This update comes at a perfect time when remote work and collaboration are becoming increasingly common.


By automating the Pro Management agent deployment and device enrollment tasks for IT admins, this move makes their workload lighter and improves the user experience. Additionally, the elimination of the need for any additional user action makes the process more efficient and less prone to errors. This is especially important for organizations that have many Windows-based Teams Rooms devices that need to be managed.


With the Teams Rooms app update (v. 4.17) set to be released by the end of June 2023, organizations can take advantage of the streamlined device registration process and enhance their device management capabilities with the Pro Management service.


Overall, this update is a positive development for the industry, highlighting the need for continuous improvement and innovation in device management. The focus on providing a seamless and hassle-free device registration experience for IT admins is a step in the right direction toward improving collaboration and productivity in the workplace.

Requirement -

If you have a Teams Room Pro license on your MTRW Devices, they will be automatically enrolled in the pro management portal. This will provide you with advanced Microsoft Teams Rooms monitoring and remote management capabilities.

An error occurred while executing Add-TeamChannelUser to add the user to the private channel and make them an owner - Could not find the member

Last year, Microsoft introduced a public preview PowerShell module (2.0) to enable the addition of users to private groups and channels using the Add-TeamChannelUser cmdlet. This feature was later included in the GA release.

Recently, I found myself migrating from Slack to Teams and had over 20 private channels that required the addition of a new owner. I needed to add this user to the group.

When running the below command, I get an error "Error occurred while executing - Could not find the member."

Add-TeamChannelUser -GroupId $group.GroupID -User "stajone@domain.com" -DisplayName the_coalition -Role Owner


Resolution -

  • You need to manually add the user to the group via PowerShell.
    • Add-TeamUser -GroupID/DisplayName "Test Group" -User stajone@domain.com -Role Owner
  • Add the user to the private channel as a member first.
    • Add-TeamChannelUser -GroupId $group.GroupID -User "stajone@domain.com" -DisplayName the_coalition
  • Promote the user as a private channel owner.
    • Add-TeamChannelUser -GroupId $group.GroupID -User "stajone@domain.com" -DisplayName the_coalition -Role Owner

Thursday, May 25, 2023

Update - Teams Room Pro Portal for Manual MTR Teams App update & ServiceNow Incident Process for Warning & Recommendation alerts


In the last article, we looked at eligible Microsoft Teams Room on Windows devices getting Windows 11 22H2 update. The update is coming starting June'2023. Microsoft released the new MTR Teams App version 4.16.134 for Windows, which you can install using a manual method to validate whether your devices are eligible and working as expected. If any Windows Update URL/IPs are blocked on your network/Proxy.


Microsoft Teams Pro portal now has the new option under the action tab on the device page to trigger the Teams app upgrade without you logging in to the device to install/upgrade them.

  • Login to https://portal.rooms.microsoft.com with the administrator role.
  • Select Room on the left side and select the desire MTRoW device.
  • Select Action tab and select "Install Teams Meeting Room 4.16.134 update and click "Run"
  • Provide the justification and Click "Run".


It's important to be aware that while upgrading, you won't be able to multitask until it's finished.


You can check the status under the activity tab


The upgrade will be completed in just 5 minutes, and after that, you will have access to more detailed information about it.


Once the Teams app upgrade to latest version ensure the Teams is able to login successfully at least once. Once the release has been installed and the devices have been successfully booted up, switch to admin mode and use the Windows Settings app to check for updates. Depending on the supported devices, you should be offered the option to download and install either Windows 11 22H2 or Windows 10 22H2.


For those customers using the ServiceNow ticket integration, all Warning & Recommendations incidents (including Security) will no longer generate a SNOW ticket from the Pro Management portal. This change only affects ServiceNow integration. Any warning or Recommendation incident will still be visible on the Incident dashboard; under the individual Room status and through email notifications.