Install Windows Server 2012 Step-By-Step
System Requirements: -
The following are estimated system requirements for the Windows Server 2012. If your computer has less than the "minimum" requirements, you will not be able to install this product correctly.
Minimum: 1.4 GHz 64-bit processor
Minimum: 512 MB
Minimum: 32 GB
You also need to have the following:
DVD drive
Super VGA (800 x 600) or higher-resolution monitor
Keyboard and Mouse
Internet access
Steps 1: -
Insert Windows Server 2012 DVD in the server and boot the server
Server Loading Windows File for installation

Select Language and Time settings to Install and Next

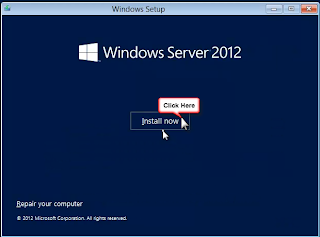
Click Install Now button
Steps 5: -
Select Windows Server 2012 Datacenter (Server with a GUI) and Click Next

Select License Agreement and Click Next


Steps 8:- Select Disk and Click Next

Now Windows Installation started.

Now Windows Installation has been completed Finalizing your settings

Steps 11: -
Press Ctl+Alt+Delete to sign in

Enter Local Administrator Password and hit Enter

Steps 13: -
Pressing Windows Key on the keyboard will bring up the start screen (formerly known as Start Menu). If you Right-Click on Computer, you will see the new right-click menu is on the bottom of the screen instead of in a dropdown box. Select Properties.

Steps: - 14
You will see that the System Properties screen looks almost identical to prior
versions of windows. We can now change the computer name by clicking on
Change Settings Change Your Computer Name and Restart your computer

Steps 15: -Restart your Computer to get apply

Steps: 16 :-
Once Server restarted login to computer using above administrator and password and Select System Properties and Enter your Domain Name to Join your computer with Domain . User Need domain admin Permission for join the computer to Domain.

Steps 17 :- Enter Domain Name and followed by enter Domain Administrator Credentials to Join the server to domain Click OK to restart your computer.

Steps 18:-
Once server rebooted Press Ctl+Alt+Delete to Sign in
Steps 19 :-
User your domain user credentials to Login to server

Now we have installed Windows server 2012 successfully.
Enjoy...
Thanks
No comments:
Post a Comment