Sunday, April 28, 2013

Enable Datacenter Activation Coordination (DAC) Mode in Exchange 2010 DAG

Enable Datacenter Activation Coordination (DAC) Mode in Exchange 2010 DAG

Datacenter Activation Coordination (DAC) Mode is a property of a DAG which can be turned on or off. DAC mode is disabled by default and should only be enabled for DAGs with three or more DAG members that have been deployed in a multi-datacenter configuration. DAC mode shouldn’t be enabled for

  • 2 member DAGs where each member is in a different AD site
  • 2-16 member DAGs where all members are in the same AD site

In case you try to turn on DAC where it is not supported, an error will be returned.


Note: In the expected Exchange 2010 SP1, DAC mode will be extended to support two-member DAGs that have each member in a separate datacenter. In addition, DAC mode will be extended to support DAGs that have all members deployed in a single Active Directory site, including AD sites that have been extended to multiple locations. So in SP1, you can now use DAC mode for all DAGs with two or more members.

DAC mode is configured to avoid a “split brain syndrome”. I will explain with an example. Let’s say we have a four member DAG, with two servers in each datacenter. The primary datacenter hosts the witness server and hence will always be in quorum. Now, let’s say that a power outage occurs in the primary datacenter and the exchange admin activates the secondary datacenter with an alternate file share witness.
When the power is restored in the primary site, servers come online quicker than the WAN links. Hence, when the two DAG members and witness server comes online, it has a quorum (majority) and will try to activate the databases. This will cause a “split brain syndrome” where both datacenters think that they are hosting the active databases.
DAC mode was introduced to avoid this situation. When DAC mode is enabled and the DAG members come back online, they will leverage a protocol called Datacenter Activation Coordination Protocol (DACP) before trying to mount the databases.  The DACP is used to determine the current state of the DAG and whether Active Manager should try to mount the databases or not.
Now for the technical bit as to how DAC works!
Active Manager stores a bit in memory (either a 0 or  1) that tells the DAG whether it’s allowed to mount local databases that are assigned as active on the server. When a DAG is running in DAC mode, each time Active Manager starts up, the bit is set to 0, which means that it isn’t allowed to mount databases. When in DAC mode, the server must try to communicate with all other members of the DAG that it knows to get another DAG member to give it an answer as to whether it can mount local databases that are assigned as active to it. The answer comes in the form of the bit setting for other Active Managers in the DAG. If another server responds that it’s bit is set to 1, it means that servers are allowed to mount databases. Hence, the server starting up sets its bit to 1 and mounts its databases.
Let’s find how DAC helps in “split brain” scenario in our example. When power is restored to the primary datacenter, the servers come online before WAN links and all of the DAG members in the primary datacenter will have a DACP bit value of 0. Hence, none of the servers in the primary datacenter will mount databases as they cannot communicate with a DAG member that has a DACP bit value of 1.
DAC mode can be turned on by running the shell command below.
Set-DatabaseAvailabilityGroup –identity “DAGONE” –DatacenterActivationMode DagOnly
 

Saturday, April 27, 2013

Install Windows Server 2012 Step-By-Step

Install Windows Server 2012 Step-By-Step


 This document provides information about installing the Windows Server 2012 operating system, including any known issues that you may need to work around before starting an installation.

System Requirements: -

The following are estimated system requirements for the Windows Server 2012. If your computer has less than the "minimum" requirements, you will not be able to install this product correctly.

Minimum: 1.4 GHz 64-bit processor
Minimum: 512 MB

Minimum: 32 GB

You also need to have the following:
DVD drive
Super VGA (800 x 600) or higher-resolution monitor
Keyboard and Mouse
Internet access

Steps 1: -

Insert Windows Server 2012 DVD in the server and boot the server
Steps 2: -

Server Loading Windows File for installation

Steps 3: -

Select Language and Time settings to Install and Next
Steps 4: -

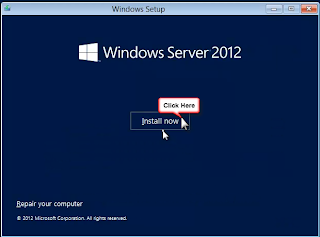
Click Install Now button

Steps 5: -

Select Windows Server 2012 Datacenter (Server with a GUI) and Click Next

Steps 6: -

Select License Agreement and Click Next

 
Steps 7: - Select Custom Install Windows Only and Click Next


Steps 8:- Select Disk and Click Next

 
Steps 9: -

Now Windows Installation started.

Steps 10: -

Now Windows Installation has been completed Finalizing your settings


Steps 11: -

Press Ctl+Alt+Delete to sign in


 Steps 12 :-

Enter Local Administrator Password and hit Enter


Steps 13: -

Pressing Windows Key on the keyboard will bring up the start screen (formerly known as Start Menu). If you Right-Click on Computer, you will see the new right-click menu is on the bottom of the screen instead of in a dropdown box. Select Properties.


Steps: - 14
 
You will see that the System Properties screen looks almost identical to prior versions of windows. We can now change the computer name by clicking on Change Settings Change Your Computer Name and Restart your computer 
 
Steps 15: -Restart your Computer to get apply 
 
 
Steps: 16 :-
 
Once Server restarted login to computer using above administrator and password and Select System Properties and Enter your Domain Name to Join your computer with Domain . User Need domain admin Permission for join the computer to Domain.
 
Steps 17 :- Enter Domain Name and followed by enter Domain Administrator Credentials to Join the server to domain Click OK to restart your computer.


Steps 18:-

Once server rebooted Press Ctl+Alt+Delete to Sign in

 
Steps 19 :-
 
User your domain user credentials to Login to server


Now we have installed Windows server 2012 successfully.

Enjoy...

Thanks


How to Create Bulk user account in Active Directory by using Powershell.


Create AD multiple user accounts by using PowerShell

Many times we come across a scenario where we need to create bulk of AD user accounts. As an Expert we came up with an idea went ahead and made a PowerShell Script that will create users from a CSV file. Hope you find it useful!!!!

We have tested the below script in Windows Server 2008 R2 AD infrastructure.


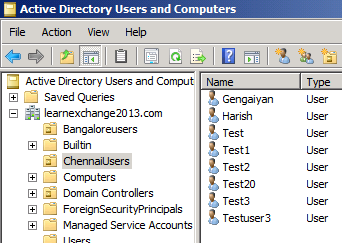
We have created a test OU as ChennaiUsers in our Learnexchange2013.com with no users.


Below is the Power shell script in text format to create bulk users in AD.


The Script data is below, copy the below text into Notepad and save it as AccountCreate.ps1

Import-Csv \.AccountCreate.Csv | foreach-Object {$Userprincipalname =$_.samAccountName + "@learnexchange2013.com"
New-ADuser -Name $_.firstName -surname $_.lastname -samaccountname $_.samaccountname -userprincipalname $_.userprincipalname -path $_.path -accountpassword (convertTo-secureString "U@se123r" -asplaintext -force) -Enabled $true}


Create User account Properties details in CSV format as per below..


Save the file details in CSV format as per below..Copy both above files in the same location.

Open Active Directory Power shell and navigate to above location and execute the .ps1


Sunday, April 14, 2013

Multiple management objects were found for Identity. When enabling Lync users.

Multiple management objects were found for Identity. When enabling Lync users.
Issue: Multiple management objects were found for identity "...”


Problem Statement:
While enabling Lync account through Lync Management Shell, receiving above error.
Error itself says multiple management objects found means either Alias or first name / Last name same with multiple objects.
In my case there are two objects has same alias name.
Resolution:
Basic command:
Option: 1
Enable-CsUser -Identity "Alias Name" -RegistrarPool "pool1.mydomain.com" -SipAddressType EmailAddress  -SipDomain mydomain.com
Option: 2
Enable-CsUser –Identity "CN=Ilag, Balu,OU=Users,DC=mydomain,DC=com
There is multiple resolution and all differ case to case.
1.    Use alias name instead of First / Last name. Option:1
2.    You can use name (first / last name) instead of Alias. Option:2
3.    If Alias name are same then change one of the objects alias and wait until AD replication completes.
Thank you