Sunday, July 21, 2013

Your account has been disabled error message when you try to sign in to Outlook Web App

Issue:

When user trying to access the mailbox in OWA they getting error message “"Your account has been disabled" 

Error Message: -


Additionally, if you click Show Details in the dialog box, you see stack trace results that resemble the following:

Request
Url: https://webmail.learnexchange.com:443/owa/
User host address: 192.168.1.1
User: Gengaiyan
EX Address: /o=mms/ou=exchange administrative group (fydibohf23spdlt)/cn=recipients/cn=Gengaiyan
SMTP Address: Gengaiyan@learnexchange.com
OWA version: 14.2.318.3
Exception
Exception type: Microsoft.Exchange.Data.Storage.AccountDisabledException
Exception message: Cannot open mailbox /o=mms/ou=exchange administrative group (fydibohf23spdlt)/cn=recipients/cn=Gengaiyan.

Error Statement: -

This error message basically occurs due to Active Directory Replication delay, Wait for 15 minutes after above change.
If mailbox is not working after 15 minutes  then it’s something wrong on the mailbox, So take the below action to resolve the issue.

Resolution: -

1.   Disable the Mailbox

i)             In the console tree, navigate to Recipient Configuration > Mailbox.
ii)           In the result pane, select the mailbox that you want to disable.
iii)          In the action pane, under the name of the mailbox, click Disable.
iv)          A warning appears asking, Are you sure you want to disable 'mailbox name'? Click Yes to disable the mailbox.

2.   Clean the Mailbox database

Get-Mailboxdatabase –Identity “DB01” | Clean-Mailboxdatabase

3.   Reconnect the mailbox.

i)             In the console tree, navigate to Recipient Configuration > Disconnected Mailbox.
ii)           In the result pane, select the mailbox that you want to Connect.
iii)          In the action pane, under the name of the mailbox, click Connect.
iv)          Select match user and Click Browse and find the match user and connect. It will take some time to reflect in Mailbox Container.
v)            If mailbox does not appear after replication, Run Get-Mailboxdatabase | Clean-Mailboxdatabase.

Once Mailbox appeared in Mailbox Container, Try to access the mailbox in OWA and Outlook it will work.
Thanks
Keep Visit.

Cannot open your default e-mail folders. Microsoft Exchange is not available. Ether there are network problems or the exchange Computer is down for maintenance

Issue: -
Cannot open your default e-mail folder" error when users try to open their mailboxes in Outlook after migration from Exchange 2003 to Exchange 2010
Error Message: -

When you trying to open Mailbox in outlook either 2007/2010, It will through “Cannot open your default e-mail folders. Microsoft Exchange is not available. Ether there are network problems or the exchange Computer is down for maintenance”.
Error Statement: -
When mailbox migrated from Exchange 2003 to Exchange 2010 some attributes are getting duplicated with other mailboxes. This will happen when you have replication problem or Active Directory unhealthy.
Resolution: -
To find the duplicate proxy address in active directory, Please follow the below steps
1.           Log on to the Client Access server (CAS) to which the users are connected, and then locate the following folder that stores the log file: 
C:\Program Files\Microsoft\Exchange Server\V14\Logging\RPC Client Access
2.           You can find the user logon server by using below command
Get-logonstatistics –Identity “User Email address”
3.           Open the RCA-YYYYMMDD-X.log file, and then search events that are related to the users in question. For example, you find the following information:
/O=Learnexchange/OU=First Administrative Group/cn=Recipients/cn=Gengaiyan' ,,,12.0.6315.5000,,170.12.8.90,fe80::78dd:fc1:9cb8:2e72%11,ncacn_ip_tcp,Connect,0,,,RpcDispatch: Unable to map userDn '/O=Learnexchange/OU=First Administrative Group/cn=Recipients/cn=Gengaiyan' to exchangePrincipal (StoreError=UnknownUser)
4.            '/O=Learnexchange/OU=First Administrative Group/cn=Recipients/cn=Gengaiyan' ,,,12.0.6315.5000,,170.12.8.90,fe80::78dd:fc1:9cb8:2e72%11,ncacn_ip_tcp,Connect,0,,,RpcDispatch: Unable to map userDn '/O=Learnexchange/OU=First Administrative Group/cn=Recipients/cn=Gengaiyan' to exchangePrincipal (StoreError=UnknownUser)

5.           Copy the LegacyexchangeDn information of the user. For example, copy the following:
/O=Learnexchange/OU=First Administrative Group/cn=Recipients/cn=Gengaiyan
6.           In Active Directory Users and Computer (ADUC), right-click the domain object, and then click Find.
Click the list next to Find, and then select Custom search.
Click Advanced, type the following Lightweight Directory Access Protocol (LDAP) statement under Enter LDAP query, and then click Find Now:
(proxyaddresses=X500:/O=Learnexchange/OU=First Administrative Group/cn=Recipients/cn=Gengaiyan)C
Determine whether any duplicate users are returned.
7.           Check the X500 address of any returned users, and then remove the duplicate proxy address for those users.

After removed the duplicate proxy address still user not able to access the mailbox in outlook and sometime OWA as well.

But some other scenario it will not work please follow the below process Your account has been disabled error message when you try to sign in to Outlook Web App
Thanks..
Keep Visit...

Wednesday, July 10, 2013

Event ID 1 is logged on the Exchange Server 2010 Client Access server in a mixed Exchange Server 2010 and Exchange Server 2003 environment.


Issue: -

Event ID 1 is logged on the Exchange Server 2010 Client Access server in a mixed Exchange Server 2010 and Exchange Server 2003 environment.

Error Message: -

Unhandled Exception “User Setting PreferredSite is not available”


Problem Statement: -

1.    When you have Exchange 2010 RU3 or less and Exchange 2003 in a mixed mode environment, you could see Event ID 1 keep logged on Exchange 2010 Client Access server.

2.    An Exchange Server 2003 user creates a new Microsoft Outlook profile or runs the Test E-mail AutoConfiguration tool in Microsoft Office Outlook 2007 or Microsoft Outlook 2010.

Resolution: -

Microsoft (Scott) confirmed that this issue with Microsoft software bug to resolve the issue you need to upgrade the Exchange 2010 RU3 to Exchange 2010 RU5v2.

Please follow the below Microsoft Technet Article for upgrade Exchange 2010 RU3 to Exchange 2010 RU5v2.

 
Thanks.

Friday, July 5, 2013

Upgrade Exchange 2010 SP1 to SP2 RU5v2 on CLIENT ACCESS SERVER& HUBTRANSPORT SERVER


Purpose of this Article

Many of my folks asked me how to upgrade the Exchange Server with FPE 2010. This article ships through the process of upgrading Exchange 2010 SP1 to Exchange 2010 SP2 RU5v2 on Client Access Server & Hub Transport Server.

Prerequisites

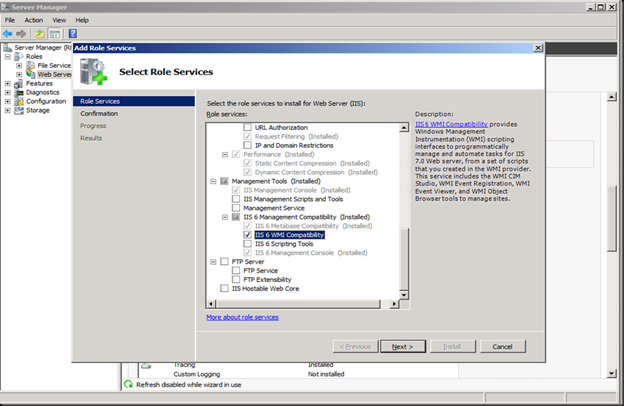
1.   IIS6 WMI Compatibility.

2.   Stop all Exchange Server services.


3.   Stop any Forefront Server Security or Forefront Protection services that might still be running after Exchange has been stopped.

4.   Disable Forefront via the FSC Utility:

                    FSCUtility /disable

5.   Verify the FPE status

                    FSCUtility /status

6.   Install the service pack or the software update from Microsoft.

Note: - If you want to confirm that Exchange is working correctly after the update is applied, you can start Exchange and then verify that all services are working. Then, stop all exchange services. You can do this before you continue to the next step. However, be aware that this step will let mail flow unprotected until Forefront is re-enabled.

7.    Enable Forefront using the FSC Utility.

          FSCUtility /enable

8.   Verify the FPE status

          FSCUtility /status

9.   Start the Exchange Services.

10. Start any Forefront services that are stopped. 

Installation Process: -

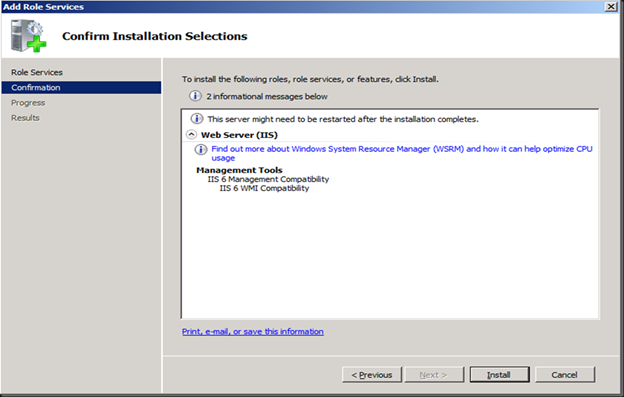
1.   Installing IIS 6 WMI Compatibility by installing this via “Add Role Services” in Server Manager for the Web Server (IIS) role.


Prepare Schema: -


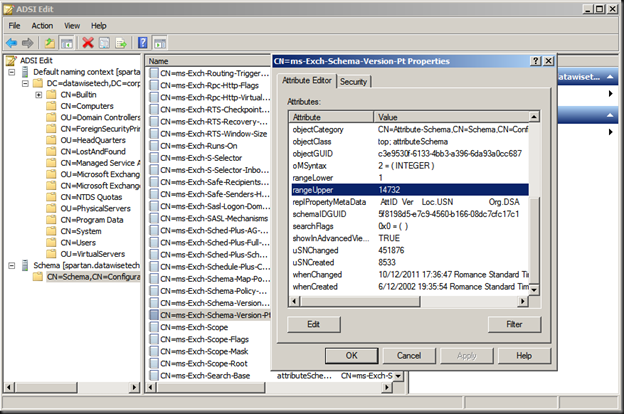
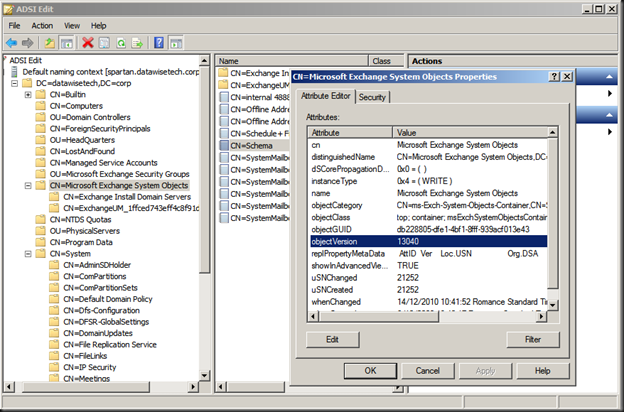
Verify Schema Version: -


The rangeUpper property of “CN=ms-Exch-Schema-Version-Pt,cn=schema,cn=configuration,<Forest DN>” should be 14732. You can also check this using dsquery * CN=ms-Exch-Schema-Version-Pt,cn=schema,cn=configuration,<Forest DN> -scope base –attr rangeUpper tocheck this value


The value for objectVersion in the properties of “CN=Microsoft Exchange System Objects” should be 13040. This is the domain schema version. Via dsquery this is done as follows: dsquery * “CN=Microsoft Exchange System Objects,DC=Performance,DC=pfgc,DC=Com” -scope 
base -attr objectVersion


You’ll have to wait for them to give you the go ahead when everything is replicated and all is still working fine.

Order of upgrade Exchange 2010 servers


i)             CAS servers


ii)           HUB Transport servers


iii)          Unified Messaging servers


iv)          Mailbox servers


Upgrade Process of Exchange 2010 SP1 to SP2: -

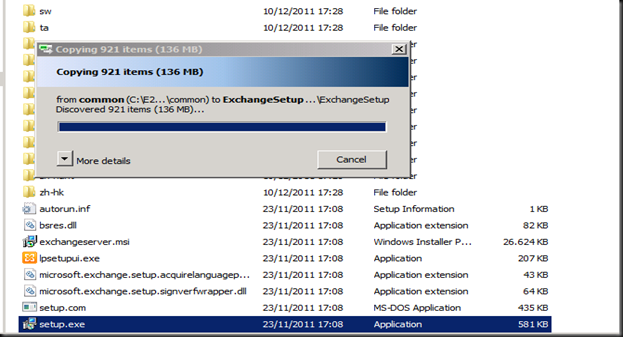
1.Once you’ve downloaded the bits and have the Exchange2010-SP2-x64.exe file click it to extract the contents. Find the setup.exe and it will copy the files it needs to start the installation.


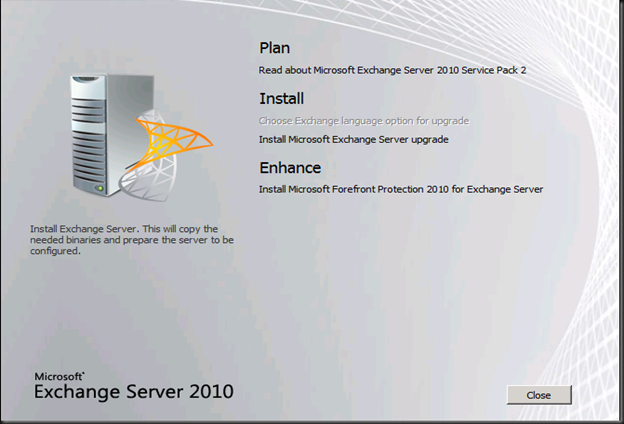
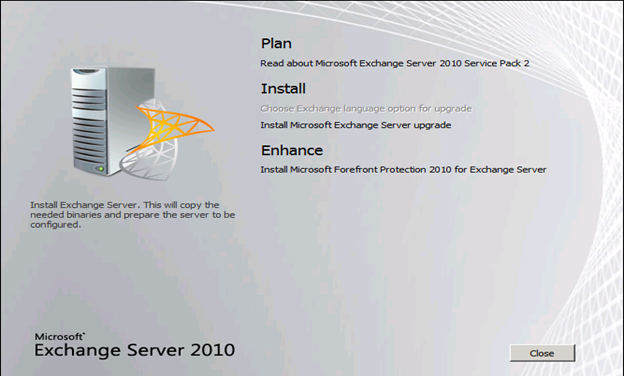
2.You then arrive at the welcome screen where you choose “Install Microsoft Exchange Server Upgrade”


3.The setup then initializes

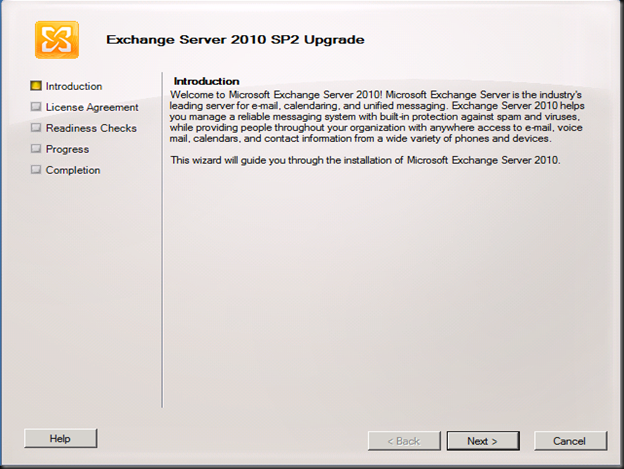
     4. You get to the Upgrade Introduction screen where you can read and Click Next


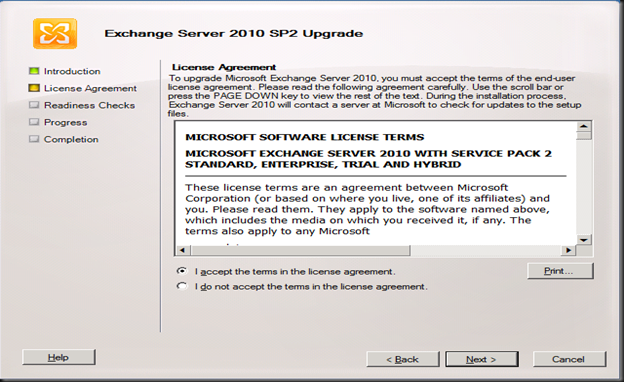
5. You accept the EULA


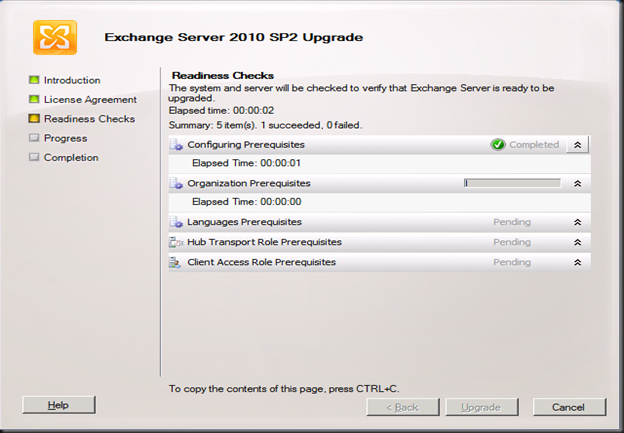
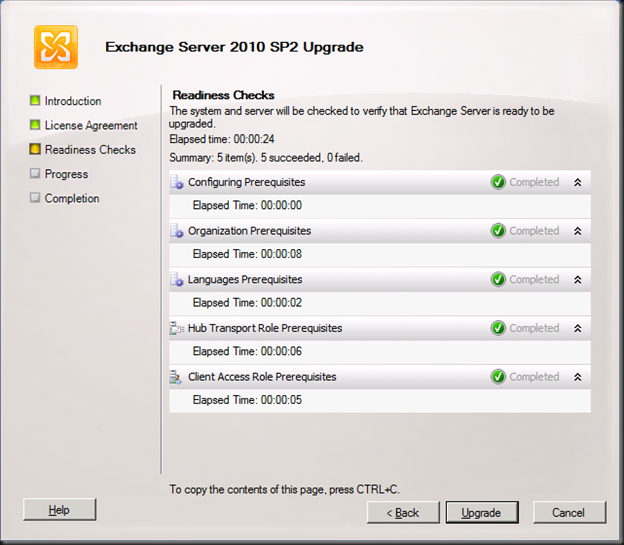
 6.   And watch the wizard run the readiness checks


7. We have our CAS/HUB servers on the same nodes, so the prerequisites are checked for both. The CAS servers in Exchange 2010 SP2 need the IIS 6 WMI Compatibility Feature. If you had done the upgrade from the CLI you would have to run SETUP /m:upgrade /InstallWindowsComponents.


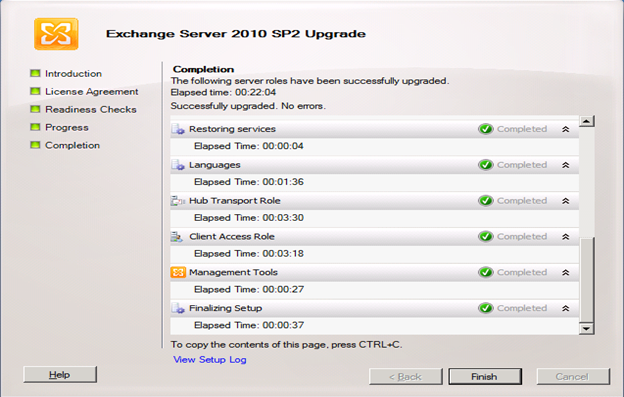
8.  But then it completes and you can click “Finish”


9. Close


Once the upgrade has been completed successfully. We need to start the FPE Service.


Enable Forefront using the FSC Utility. 

          FSCUtility /enable

Verify the FPE status

          FSCUtility /status

Start the Exchange Services.

Thanks
Keep your comments..

HTTP 500 (Internal Server Error) in Exchange 2010


Environment: -

In our Microsoft Exchange 2003 Environment and just a started move the Mailboxes to Microsoft Exchange 2010. Recently we had the problem that some Mobile Devices weren’t able to sync via ActiveSync. At the beginning it seemed that just iPad & iPhone Mobiles.

Error Message: -

On the mobiles we just got an HTTP 500 (Internal Server Error). Also in the IIS-Log file I didn’t get that much information. Also just HTTP 500. Also verified the same in Exchange Test connectivity analyzer (https://www.testexchangeconnectivity.com) it’s giving the same Folder Sync HTTP 500 (Internal Server Error).

Problem Statement: -

Due to the above error user will not able to sync the corporate emails in mobile device.

Resolution: -

I have verified user mailbox association list by Login to ECP and Exchange Management Shell no device associated in the user account.

Get-ActivesyncDevice –Mailbox “Gengaiyan”

So after a moment of thinking I remembered that need to check some couple of things in Active Directory. Because I always use “Advanced Features” and especially “Users, Contacts, Groups, and Computers as containers” within DSA.MSC. I just switched to that MMC and changed to a user account where I knew that ActiveSync is working.


So, beyond an ActiveSync enabled user account (which already synced with a device) you’ll find a new container called “ExchangeActiveSyncDevices“. Within that container you’ll find entries for every device this user is currently syncing or synced once in the life time (unless the device was removed within ECP or so).
           
Actually the error (HTTP 500 Internal Error) occurs because Exchange isn’t able to create this container. This can happen if user account Inheritance was not “Checked”.


So within the Properties of a user account at the Security Tab (if you can’t see that one you have so enable the “Advanced Features” within View) -> Advanced the Check Box “Include inheritable permission from this object’s parent” should be checked.

And Exchange 2010 grants special permissions to the group “Exchange Servers” at the Domain Level that actually grants “Create/Delete msExchActiveSyncDevices objects“.


Once I have given the Exchange server permission on affected user account user start syncing the emails in iPhone/iPad without any issues. Also I have re-run the Exchange Test Connectivity analyzer and all the test got successful. J

Thanks

Keep your comments..

Thursday, July 4, 2013

Difference between Mail-Contact and Mail-User


Many of folks keep asking what the difference between Mail User and Mail Contact is. So I thought to publish this here, so the folks can read it anytime for reference.

Exchange Server 2010 actually defines sixteen different types of recipients. With so many recipient types, a certain level of confusion can be expected. One of the most frequently misunderstood concepts is the difference between a mail contact and a mail user.

Active Directory contacts


Before we examine the concept of mail contacts versus mail users, let’s take a moment to look at contacts in general. Contacts are Active Directory objects that are totally independent of Exchange Server. If you look at Figure 1, you’ll see that the Active Directory Users and Computers console contains an option to create new contacts.


Existing contacts are displayed in the console's Users container, alongside regular user accounts. Contacts represent users who do not log into your domain. For example, some Exchange organizations have contacts that represent suppliers or customers.

An Active Directory contact is really just a repository for information. For example, a contact object can store an associated individual’s phone number, mailing address, etc.

Exchange 2010 mail contacts


Mail contacts are an Exchange recipient type. They are essentially the same thing as Active Directory contacts, but with one exception -- they are mail-enabled.


Mail contacts are created through the Exchange Management Console (EMC) by right-clicking the Recipient Configuration container, then selecting the New Mail Contact command. When you do, Exchange launches the New Mail Contact wizard. The wizard gives you the option to create a new contact or to mail-enable an existing Active Directory contact.


You can create a new contact or mail-enable an existing contact in Exchange 2010.

You’ll see that the wizard associates an alias and SMTP address with the existing contact. You also have the option to create a new contact. This is because a mail contact is the same thing as a mail-enabled contact.

 
Exchange 2010 mail users


Mail users are very similar to mail contacts. Both are Active Directory objects that contain user contact information and an external email address. Likewise, both mail users and mail contacts appear in the Global Address List (GAL). However, there is one very important difference between a mail contact and a mail user.


Mail users are Active Directory security principles. In other words, a mail user has an Active Directory account they can use to log into your network. Therefore, a mail user can access resources on your file servers, Printers and shared drive etc. participate in Active Directory security groups and be managed the same way as any other user.

The only thing that differentiates a mail user from any other user in an Exchange organization is that mail users cannot send and receive Exchange mail. The user's account is a link to an external email address.

I also want to point out that some of the terminology used in Exchange circles can be confusing. Microsoft refers to Active Directory users with Exchange mailboxes as Mail Enabled Users; do not confuse this with mail users. These mailboxes are also sometimes referred to as user mailboxes. I’ve also seen corresponding accounts referred to as mailbox-enabled users.


Should you use mail contacts or mail users in Exchange 2010?


So which is more beneficial -- mail contacts or mail users? The primary advantage to using mail contacts is there are no licensing requirements. A mail contact is just an Active Directory object. There is no corresponding user account and no Exchange Server mailbox. Therefore, there is nothing to license. In contrast, mail users have an Active Directory account and require a client access license (CAL).


While the main benefit of using mail users is to access network resources within organization, there is one other benefit worth mentioning. It is generally impossible to convert a mail contact into a user mailbox. But if you want to turn a mail contact into a mail-enabled user, you must delete the contact and create the user account and mailbox. Also, mail users can be converted to mail-enabled users with the Get-MailUser <user name> | Enable-Mailbox EMC command.

Get-MailUser –Identity “Gengaiyan” | Enable-Mailbox –Database “DB1”

Both mail contacts and mail users have their place. That said, if you decide to use mail users, it is important to properly license them. A Windows CAL is required, but an Exchange Server license is not required because the user doesn’t have an Exchange mailbox.


Thanks,

Keep your comments.. 


Monday, July 1, 2013

Install and configure Office Web App Server 2013 on Windows Server 2012


Introduction

With Exchange 2007 and 2010, Outlook Web Access/App [OWA] users can preview documents attached to e-mails directly from their browser. This feature, known as WebReady Document Viewing, converts supported documents (Word, Excel, PowerPoint or PDF) to HTML and displays them in the web browser, allowing users to read Word documents, for example, without the need to have Word installed or first downloading the file.

Whenever a user receives an e-mail with a supported attachment, an “Open as Web Page” link appears next to the attachment:

 
All the user needs to do to preview the attachment is click on the link and the WebReady Viewing version of the document will open


With Exchange 2013 there is another method to preview these types of documents. To provide an even better experience to users, we can integrate Exchange 2013 with Microsoft Office Web Apps Server [OWAS].

Up until now, to provide the WebReady Document Viewing functionality, Microsoft relied partially on 3rd-party components. With all the security concerns that there has been around this functionality, replacing it with OWAS might not be such a bad idea... This also means that Microsoft has full control over all the components used by this feature. 

By default, the following file types are displayed using OWAS:

  • Word documents (doc, docx, dotx, dot and dotm extensions);
  • Excel documents (xls, xlsx, xlsm, xlm and xlsb extensions);
  • PowerPoint documents (ppt, pptx, pps, ppsx, potx, pot, pptm, potm and ppsm extensions).

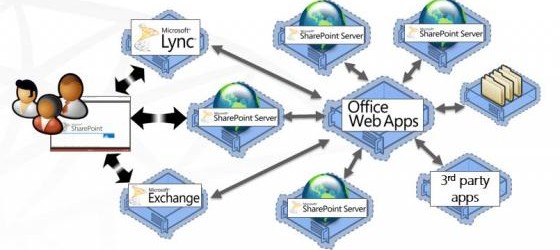
With previous editions of Exchange, WebReady Document Viewing is built in to Exchange. With OWAS integration in Exchange 2013, SharePoint 2013 and Lync Server 2013, when a user wants to preview an Office attachment, Exchange/SharePoint/Lync makes a Web app Open Platform Interface [WOPI] call to the Office Web Apps Server which renders the document instead.
Office Web App Server Architecture Work Flow: -


Installing Office Web Apps Server

Prerequisites: -
The first step is to install the prerequisite software for OWAS. To do this, open a PowerShell console as an administrator and run the following cmdlet and then restart the server:
Add-WindowsFeature Web-Server,Web-Mgmt-Tools,Web-Mgmt-Console,Web-WebServer,Web-Common-Http,Web-Default-Doc,Web-Static-Content,Web-Performance,Web-Stat-Compression,Web-Dyn-Compression,Web-Security,Web-Filtering,Web-Windows-Auth,Web-App-Dev,Web-Net-Ext45,Web-Asp-Net45,Web-ISAPI-Ext,Web-ISAPI-Filter,Web-Includes,InkandHandwritingServices
 

Note: -
Please remember that you should not install the Office Web apps server in any of the following server.
1.    Exchange Server 2013

2.    Lync Server 2013

3.    SharePoint 2013

Web App server should install on dedicated server.

 
1.    Extract the Windows Image file and Double click Setup.exe

On the Read the Microsoft Software License Terms page, select I accept the terms of this agreement and then select Continue:


2.    On the Choose a file location page, select the folder where you want to install OWAS and then select Install Now (I left the default location):


3.    When Setup finishes installing Office Web Apps Server, click on Close:


After installing Office Web Apps Server, you might notice that there is no GUI to manage it! This is because configuration and management of OWAS is done solely through PowerShell. Unlike products such as Exchange, Lync or even SCOM, OWAS only has a few cmdlets:


Configure Office Web Apps Server: - 

Now that Office Web Apps Server is installed, we need to configure it. 

OWAS can communicate with SharePoint, Lync and Exchange using HTTPS by the means of a digital certificate. This is obviously highly recommended for production environments. In a test environment, however, you do not need to use HTTPS, but in this case Lync will not work. 

If you want to use HTTPS, please note that the certificate used in the OWAS server must meet the following requirements: 

·         The certificate must come from a trusted Certificate Authority [CA] and include the fully qualified domain name of the Office Web Apps Server farm in the Subject Alternative Name field (and must not begin with an asterisk); 

·         The certificate must have an exportable private key; 

·         The Friendly name field must be unique within the Trusted Root Certificate Authorities store; 

After obtaining an SSL certificate from your own or a 3rd-party CA (usually recommended if you plan to allow external access to your OWAS server) you have to import the certificate to the OWAS server (I used the Certificates MMC to request a certificate from my internal CA which automatically saves it into the local certificate store). However, don’t bind the certificate manually in IIS as this will be done automatically as we will see shortly.

Although we are installing OWAS in a single-server, we still need to create a farm.
 
This is done using the New-OfficeWebAppsFarm cmdlet and the following parameters: 

·         –InternalURL is the FQDN name of the server that runs OWAS; 

·         –ExternalURL is the FQDN name so that OWAS can be accessed on the Internet; 

·         –CertificateName is the friendly name of the certificate to be used for HTTPS;


·         –EditingEnabled (optional) enables editing in Office Web Apps when it is used together with SharePoint. It is not used by Lync or Exchange because these hosts do not support editing. 

There are many additional parameters to configure a farm, which are not relevant for this article. To know more about these, run: Get-Help New-OfficeWebAppsFarm –Detailed 
In my environment, I used the following cmdlet:
 

New-OfficeWebAppsFarm -InternalUrl “https://owa.learnexchange.com” –CertificateName “OWA.Learnexchange.com” –EditingEnabled –ExternalURL https://owa.learnexchange.com


After the farm is created, we can see its details in the PowerShell window. To verify that OWAS is installed and configured correctly, use a web browser to navigate to the OWAS discovery URL, composed of the InternalUrl followed by /hosting/discovery. In my case:


Configure Office Web Apps Server Integration: - 

Now that we know that OWAS is working fine, let’s configure Exchange 2013 to use it. 
Configure Office Web Apps Server URL: - 

To use OWAS to render attachments in OWA, first we need to specify the URL of the OWAS using the Set-OrganizationConfig cmdlet (this is done from an Exchange Management Shell):


If everything went well, you will see the Application Log the 140 and 142 Event IDs for MSExchange OWA. 142 means the discovery of the Office Web Apps Server was successful.


Now everything working fine, Let see the document preview.. 

Office Web Apps Server Document Preview: - 

Once everything is working, we can preview Office documents the same way we do in Exchange 2007 and 2010: by clicking on the Preview link next to the attachment:


Thanks

Keep your comments..