Tuesday, July 19, 2022

Post Exchange Installation Task

In the last post (Install Exchange 2010),  we have successfully 

installed Exchange 2010 SP3, in this post, we will take look some of


the post-installation tasks.


Step 1: -

By default, first mailbox server in the environment will take 

precedence to hold arbitration mailboxes. In the last post (What are the Arbitration mailboxes and used for?), we detailed discussed about it.

The default mailbox database will be created on exchange installation path and we need to create a new database and move all mailboxes from it to the new one.

In Exchange Management Console, expand “Organization Configuration”, select Mailbox.


In Action pane, Select “New Mailbox Database”.


Enter Mailbox Database Name as per your organization naming format, Click “Next”


Change the Mailbox Database File Path & Log folder path to Non-system drives.

Don’t use system drive to store EDB and Logs which will cause performance and quicker database corruption.

Don’t select “Mount this database” if your environment consists of multiple child and multi-site environment because new database might not have replicated as sooner as system try to mount it.


In production environment, it’s recommended to uncheck mount this database while creating new database and you can mount it, later on, Click “Next”


Review the configuration details and click “New”


Once the database is created click “Finish”


Wait for 15 min for default replication interval or force the AD Replication.


Validate new database information is available in the Active Directory Configuration store.


Once you validated the database information in AD, Right Click Mailbox database that you created in the above section and select “Mount Database”


Confirm Database is mounted properly without any issues.


Check the Arbitration mailbox configuration and database information. These need to be migrated to a new database that you created above section.

To view Arbitration mailbox details: -

Get-Mailbox –Arbitration

Move the arbitration mailbox to new database

Get-Mailbox –Arbitration | New-MoveRequest –TargetDatabase “DB01”


Mailbox Move will take 5min based on Mailbox Replication Service availability, Review the mailbox move status using below command.


Get-MoveRequest


Once you moved all arbitration, administrator, discovery mailboxes to the new database, we are ready to dismount and remove.

In Exchange Management Console, expand “Organization Configuration”, select Mailbox.


Right, Click the mailbox that you would like to remove, select “Dismount Database”, confirm the request.


Mailbox database successfully removed from the environment.


Thanks for Visiting. Keep watch for the further updates!

Friday, July 15, 2022


What are the Arbitration mailboxes and used for?

By default, first mailbox server in the environment will take 

precedence to hold arbitration mailboxes. These mailboxes more important to function some of the activities in the environments.


Still, some of the exchange administrators not fully understand the use of arbitration mailboxes, this arbitration mailbox concept was introduced from Exchange 2010 onwards.

Arbitration Mailboxes: -

  • SystemMailbox{1f05a927-756e-4288-822c-7de8d00f47b5}
  • SystemMailbox{e0dc1c29-89c3-4034-b678-e6c29d823ed9}
  • FederatedEmail.4c1f4d8b-8179-4148-93bf-00a95fa1e042


SystemMailbox{1f05a927-756e-4288-822c-7de8d00f47b5} : -

This arbitration mailbox used for message moderation e.g it is used for message approval workflow. If user mailbox configured for message moderation, any email sent by the user it will be sent to his/her manager for approval, those approval process will be handled by this arbitration mailbox.

The display name of this account “Microsoft Exchange Approval Assistant”.

SystemMailbox{e0dc1c29-89c3-4034-b678-e6c29d823ed9}: -

This arbitration mailbox used for storing the admin audit logs in mailbox metadata for e-discovery.

The display name of this account “Microsoft Exchange” and it’s available from exchange 2010 onwards.

FederatedEmail.4c1f4d8b-8179-4148-93bf-00a95fa1e042 : -

This arbitration mailbox used for federation between two different organizations for sharing calendar free/busy and contact sharing process.


The display name of this account “Microsoft Exchange Federation mailbox” and it’s available from Exchange 2010 onwards.

Thanks for Visiting. Keep watch for the further updates!

Thursday, July 14, 2022

Install Exchange 2010 SP3 on Windows Server 2012 R2

In the last post (Install Exchange Pre-requisites)have installed all Exchange pre-requisites for Exchange 2010 on Windows Server 2012 R2. In this post, we will install Exchange 2010.

Step 1: -  Extract Exchange 2010 SP3, Right Click “Setup.exe” select “Run as administrator”


 Step 2: -  Select option 4 – Install Microsoft Exchange.


Step 3: - Read the instruction and Click “Next”


Step 4: - Read the Microsoft License Agreement and Select “Next”


Step 5: - Select the Installation Type. In our example we will use the Typical Option, Select “Automatically install Windows Server roles and features required for Exchange”, click Next.


Step 6: - In Client Settings, select for your organization appropriate option and Click Next


Step 7: - In configure client access server for external domain section, enter external Web URL for your organization and it will be configured automatically for all exchange sites e.g OWA, Active-Sync, EWS and Outlook Anywhere, Click “Next”.


Step 8: In Customer Improvement Program section, select the appropriate option and Click Next


Step 9: - In Readiness Check, review whether you have any warning or errors, If so, take appropriate option to remediate the errors and run the installation again till you find all section are greed and select Install.


Step 10: - Review the completion page, once everything went successfully, close the installation page and reboot the system.


Install Exchange 2010 via Command line: -

Install all windows pre-requisites including Microsoft Office Filter Packs. Once everything is installed run the below command to install the exchange roles.

Navigate to the Exchange 2010 Setup folder via command.

Setup.com /Mode:Install /Roles:MB,HT,CA,MT

MB – Mailbox Role.
HT – Hub Transport Role.
CA – Client Access Server Role.
MT – Exchange Management Tool.


Valid you can able to open Exchange Management Console and Exchange Management Shell without any errors.


Exchange Pre-Requisites installation

In the earlier post AD preparation, we have successfully prepared an active directory for exchange on windows server 2012 R2.

In this post, I will walk through, Exchange 2010 pre-requisites installation.

Before we install the Pre-Requisites let see the overview of the pre-requisites requirements.

  • Windows.NetFrameWork 3.5 and above. – Exchange User front end e.g OWA, Active-Sync, EWS running on .netFrame Work.

  •  Microsoft office Filter Pack. – Microsoft Filter pack is required to view the Excel and Word documents in OWA.
  • Microsoft Filter Pack 2010 SP1 – Updated Office Filter pack.


Download Exchange Pre-Requisites from the below locations,


 Download Exchange 2010 SP3


Download the above Pre-Requisites into Temp folder


Double Click Office Filter Pack and follow the below steps to complete the installation.


Follow the similar steps for Office Filter Pack SP1


Open Server Manager Dashboard, Select "Add roles and features", Click "Next"


Select Server Pool, click "Next"


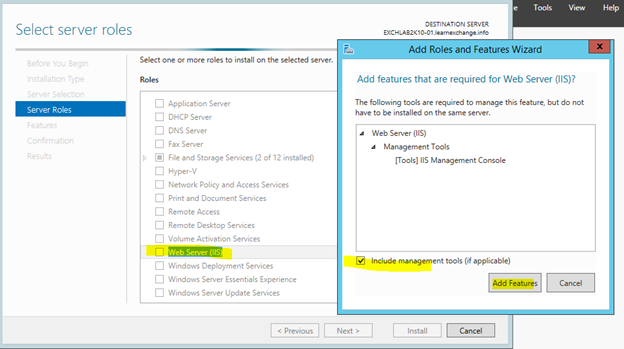
Select "Web Server (IIS) in feature section


Select ".NET Frame Work 3.5, Click "Next"


Select "Web Roles" and Click "Next"


Review the Role and Feature Selection, Click "Install"


Monitor the installation progress...


You can also install above features via command.

Add-WindowsFeature NET-Framework-Features,NET-HTTP-Activation,RPC-over-HTTP-proxy,RSAT-Clustering,Web-Mgmt-Console,WAS-Process-Model,Web-Asp-Net,Web-Basic-Auth,Web-Client-Auth,Web-Digest-Auth,Web-Dir-Browsing,Web-Dyn-Compression,Web-Http-Errors,Web-Http-Logging,Web-Http-Redirect,Web-Http-Tracing,Web-ISAPI-Ext,Web-ISAPI-Filter,Web-Lgcy-Mgmt-Console,Web-Metabase,Web-Net-Ext,Web-Request-Monitor,Web-Server,Web-Static-Content,Web-Windows-Auth,Web-WMI -Restart


Thanks for Visiting. Keep watch for the further updates!

Wednesday, July 13, 2022

Issue – Windows 2012 R2 Domain Controller promotion failed.

Error Message: - 

Verification of prerequisites for the domain controller promotion failed. The local administrator account becomes the domain administrator account when you create a new domain. The new domain cannot be created because the local administrator account password does not meet the requirements.


Error Description: -

If your system default system administrator account password doesn’t meet new domain controller password policy or default system password was not set, then you will get this error.

Resolution: -

  • Open Run.
  • Type lusrmgr.msc
  • Select Users under local users and groups.
  • Select Administrator Account, Right Click “Rest the Password”
  • Type the complex password and click OK.
Thanks for Visiting. Keep watch for the further updates!

Install and Configure a Windows server 2012 R2 Domain Controller.

Microsoft made many changes in terms of features, and GUI interface on Windows Server 2012 R2.

In this post, we are going to install active directory domain controller in windows server 2012 R2 and the process to prompt the server as a domain controller. I am in the assumption that you already installed Windows 2012 R2 OS initial setup.


Before you begin to keep in mind below things

  •          DCPROMO is gone and NO longer supported method to promote server as a domain controller.
  •          It’s highly recommended you assign static IP address that you indeed to promote as a domain controller.

There are two process steps involved to promote any member server as a domain controller in windows server 2012 R2.
  •          Adding the ADDC Role.
  •          Promoting a server as a domain controller.


The Process step 1: - Adding the ADDC Role.


After your initial windows installation, your system dashboard will be similar to the below. To get started creating a new domain controller, select “Add roles and features” option.


Before you begin, read some of the important tasks, whether you already completed or not, if it’s not completed, please go back and complete it and “Next”


Windows server 2012 separated Roles and features apart from “Remote Desktop services”. Select “Role based or feature based installation” and Click “Next”


Select a server from the server pool and click “Next”


In Server Role section, Select “Active Directory Domain services” and it will prompt you, what are the roles will be installed in windows server 2012.


In feature section, all required features required for domain controller will be selected by default automatically, please if you need any further features as part of the installation, If NO, click “Next”


In confirmation section, review the configuration settings that you have been selected so far to install on windows server 2012 and click “Install”.


The installation will take ~2min to complete.


Now the role has been installed successfully. Select “Promote this server to a domain controller”


The Process step 2: - Promoting a server as a domain controller.

You have multiple options in Deployment section, before you select the options to ensure we understand it correctly.

  •         Add a domain controller to an existing domain – This option will help you to configure member server as an additional domain controller in the existing AD domain.
  •          Add a new domain to an existing forest – This option will help you to create an additional child domain in an existing AD forest.
  •          Add a new forest – This option will help you to create a new forest (green field environment).


In my lab environment, I am promoting my first domain controller, so I am selecting “Add a new forest” option. Specify Root domain name “Learnexchange.info” and click “Next”

You might need to select another option which is appropriate for your environment.


In Domain Controller section, select “Forest and Domain functional level” and “Domain Name System (DNS)” as an additional role of the domain controller. You can see on the domain controller page also asking to update “Directory Service Restore Mode (DSRM) password which helps you to recover domain controller from disaster recovery and some metadata cleanup. Specify strong security password and store the passport in a safe place and Click “Next”


The System will automatically check on the environment either same NetBIOS name exist if NOT, it will show as your domain name that you specified earlier, Click Next.


 In Path section, System by default automatically places the Active Directory Database (NTDS.dit), Logs and SYSVOL folders in Windows System drive and it’s recommended to have in the default folder, however, you can change it to non-system drive folder and Click “Next”


Review the configuration details and “Click Install”


Track your progress and once installation is completed, please ensure you reboot the system.


That's it. You promoted Windows Server 2012 R2 as a domain controller.

Thanks visiting my page. Keep watch for the further update.